Tech Tips

CE Tech Tips — February 2021

**NOTICE**
Due to the danger and complexity of electronic equipment repair, the following technical tip is intended for professional reference only. Please refer to manufacturer’s recommendations as Encompass does not guarantee the accuracy, reliability or safety of this information.

Hitachi TV, 53SDX01B
Reason for Service: When set turns on, screen is black except for OSD.  Channels changing constantly if you can see them.
Solution: Replaced defective DM04 on control board.

LG TV, 47LE5400
Reason for Service: Set won’t start past LG Splash logo. No buttons work.
Solution: Removed large plastic heatsink and then reflowed large IC on main board.

RCA TV, HD50LPW175
Reason for Service: FPD lights up, then blinks five times, and nothing further happens.
Solution: Check all following caps in power supply: C624, C639, C641, C647 and C640.

Samsung TV, LNT3242HX/XAA
Reason for Service: Dead set, has 5V standby.
Solution: Replaced RM801 in power supply.  0.22W/1W

Samsung TV, LN46A550P3F
Reason for Service: Set makes screeching noise then shuts off.
Solution: Replaced C102, SM 47uF/6.3V Blue box cap.

Sony TV, KDL32L504
Reason for Service: Dead set.
Solution: Found bad IC6102 bad; replaced with Sony 670880101.

Viore TV, LC37VF55
Reason for Service: Set had bad picture, almost like solarized.
Solution: Replacing AS15-F on T-Con fixed set.


Want more tips? Click here to see all electronics and appliance tips!


Fixing Common Maytag Freezer Issues

**NOTICE**
Due to the danger and complexity of electronic equipment repair, the following technical tip is intended for professional reference only. Please refer to manufacturer’s recommendations as Encompass does not guarantee the accuracy, reliability or safety of this information. 

Maytag is a popular home appliance brand that makes a range of freezer units. This tech tip covers troubleshooting for different issues, including units not freezing, clicking sounds,  running all the time and leaking water.

Troubleshooting applies to these Maytag freezer models:

MRT311FFFE

MRT711SMFZ

MFW2055FRZ

MFF2055FRZ

MFF2558FEZ

MRT118FFFE

MSS25C4MGB

MFC2062FEZ

MSC21C6MFZ

MBF2258FEZ

MBF1958FEZ

MFI2570FEB

MFI2269FRB

MFT2772HEZ

MSS25N4MKZ

MFF2258FEZ


Not Freezing

Not freezing is a common issue that often only requires a simple fix instead of replacing the entire unit.

Here’s what to do:

  1. Check condenser coils: Condenser coils are a critical component in refrigerators and freezers. They transfer heat from the refrigerant to the surrounding environment. New freezers have clean coils, but over time they can attract dust, which can affect performance. To confirm coils are clean, turn off the unit, pull it out from the wall, and visually inspect. If they’re dirty, use a vacuum to remove the dust. Please note that freezers with internal coils do not require cleaning.
  2. Check evaporator fan motor: This device passes air over the coils, making heat transfer more efficient. When the motor stops working, the freezer will struggle to achieve freezing temperatures. Typically when the freezer door is opened, a micro-switch automatically switches off the fan so it doesn’t operate. To check that it’s working properly, find the micro-switch, press it, and see if the fan moves. If it doesn’t, contact a Maytag engineer to fit a replacement – part numbers WP2315539, WPW10189703, W11024089, WPW1012855, WPW10514110, and WP3-60336-001.
  3. Check the start relay: If the start relay isn’t operating correctly, the compressor won’t run, and the freezer won’t cool. If you have a multi-meter at home, you can check if the start relay is malfunctioning. Remove the component from your freezer, and then place the multimeter probes on the start and run terminals. If the unit smells burned or you can’t achieve continuity, order a replacement part.

Runs Constantly

There are many reasons why your Maytag freezer might be running all the time. Check these potential solutions:

  1. Issues with temperature control thermostat
    • Rotate control thermostat from lowest to highest setting. If you hear an audible click, the thermostat is unlikely the source of the problem.
    • If there is no click, connect the thermostat to a multimeter to test for continuity. Lack of continuity indicates a defective part.
  2. Issues with defrost timer
    • If the defrost timer doesn’t switch on, frost will accumulate on the evaporator coils, causing them to stop functioning correctly.
    • To check the defrost time, turn it using a screwdriver, and listen for a click. This should cause the compressor and fans to switch off and the coil heater to switch on.
    • If the heater switches on and defrosts the coils, the timer is faulty.
  3. Dirty condenser coils
    • On most freezers, condenser coils are inside the freezer walls and don’t require cleaning. However, if they are at the back of the unit, be sure to remove dust every 6-12 months.
    • Pull the freezer away from the wall to provide access to the coils.
    • Vacuum or use a duster.

Leaking Water

Occasionally, the freezer may leak water which usually means the defrost drain is clogged or frozen. During defrost cycles, water leaves the freezer through a defrost drain. However, water can freeze over the drain, causing subsequent flows to spill out of the bottom of the freezer over the floor.

To resolve this issue, do the following:

  1. Switch off the freezer and remove it from the wall (if you have a freestanding unit).
  2. Access the defrost drain.
  3. Thaw any ice using hot water, delivered via a turkey baster.
  4. If you experience this problem repeatedly, consider installing a drain heater.

Constantly Makes Clicking Sounds

Some Maytag freezers develop clicking sounds as they get older. This issue is caused by either a faulty start relay or problems with the compressor. Start relays provide power to the compressor – the unit that cools the freezer. When they start to fail, they can make a clicking sound.

Here’s the fix:

  1. Unplug the freezer from the main power supply.
  2. Locate the start relay.
  3. Unplug and remove the relay from the compressor (usually by unscrewing it).
  4. Use a multimeter to test for continuity between the start and run terminals.
  5. If it fails a continuity test or smells burnt, swap it out for a new one.

Compressors are vital components that circulate refrigerant throughout the refrigerator, via evaporator and condenser coils. When they become defective, they too can make a clicking sound.

Here’s the fix:

  1. Unplug the freezer from main power and pull it from the wall.
  2. Locate the condenser unit. It should be visible at the back of the appliance or behind a shroud.
  3. Use a multimeter to test for continuity between the electrical pins on the side of the compressor.
  4. If the circuit is open, it means that the compressor is defective and should only be repaired by a licensed professional.

Light Not Working

Freezer lights, just like normal lights, have a limited life. If your freezer light is out, check the following:

  1. Ensure that the light bulb is burned out and not any wires or connections to it.
  2. Check the control and display board. Sometimes these can become defective, preventing power from reaching the light (though this is rare). If the indicator light is in good working order, but won’t light when you open the door, you might need a new control panel.


Visit Fred’s Appliance Academy to learn more about the training provided in appliance repair.

Special thanks to Fred’s Appliance Academy for this helpful tip!

Want more tips? Click here to see all electronics and appliance tips!


CE Tech Tips — January 2021

**NOTICE**
Due to the danger and complexity of electronic equipment repair, the following technical tip is intended for professional reference only. Please refer to manufacturer’s recommendations as Encompass does not guarantee the accuracy, reliability or safety of this information.

Hitachi TV, 57F59A
Reason for Service: Vertical distortion at bottom of picture, or Q777 has failed.
Solution: Install deflection Kit X480315. 

LG TV, 47LG50
Reason for Service: Dead, F101 open.
Solution: Found and replaced shorted mosfet in power supply, Q502.  Replacing this and fuse restored normal operation. 

Mitsubishi TV, VS6071
Reason for Service: No vertical.
Solution: Replacing vertical IC fixed set. LA7838S

Samsung TV, UN60F6350AFXZA
Reason for Service: TV will randomly cycle on and off; gets progressively worse.
Solution: Update firmware, and disconnect Wi-Fi module to see if problem goes away.  If so, replace Wi-Fi module.

Samsung TV, LN46C600F3F
Reason for Service: Set powers up with sound, but no backlight.
Solution: Found open cap in power supply, C818, 0.47uF/450V.  Replacing this fixed set.

Sony TV, KDL-26M4000
Reason for Service: Dead
Solution: Replaced cracked IC902, #670889101, and open R904.  10ohm/half W.

Toshiba TV, 46XV645U
Reason for Service: Dead, no power.
Solution: Replaced open R850 in power supply (1.8ohm/5W) and relay.  23146564X.


Want more tips? Click here to see all electronics and appliance tips!


Dishware Still Wet After Drying in Dishwasher

**NOTICE**
Due to the danger and complexity of electronic equipment repair, the following technical tip is intended for professional reference only. Please refer to manufacturer’s recommendations as Encompass does not guarantee the accuracy, reliability or safety of this information. 

When properly functioning and using a heated dry cycle, your dishes should come out of the dishwasher spotless and dry enough to put away. There’s nothing more frustrating than water droplets dripping from newly-cleaned dishware. If this is happening, here are some common causes to check:

Dishwasher Out of Rinse Aid

Lack of rinse aid is the most probable reason for dishes to come out wet, so check this first. Rinse aid is a solution that is added with the rinse water. It helps water slide off dishware more easily. By the time the dry cycle begins, there should be less moisture on the dishes and cutlery. Rinse aid helps dry faster and remove water spots, so it’s not just a gimmick product. Without rinse aid, the heated dry cycle typically is not going to be enough to remove all the water droplets.

However, if you’ve never used rinse aid and previously dried dishes are coming out wet, you’ll need to investigate other potential reasons.

Dishwasher Overloaded

Correctly loading a dishwasher can be a true art form and lesson in organization. But when you try to cram in too many pots, pans and glassware, water can get trapped with no place to drain and heated drying will be less effective — not to mention dishes won’t get fully clean. Consider doing two separate loads or wash dishes by hand instead of overloading the machine.

Heated Dry Malfunctioning

Dishwashers have a variety of drying functions: heated dry, sanitize (high heat kills germs as well as dries dishes) or night dry (heat dries lingering condensation periodically through the wash). Regardless of which you use, they all require a working heating element. This heating element, which also heats water to the proper temperature, creates heat to dry your dishes. If it is not functioning properly, dishes will come out wet. Plus, because water is not getting heated, dishes will likely not come out as clean as normal.

The easiest way to determine if a heating element is faulty is to open the dishwasher immediately after the dry cycle ends. Dishes should be warm to the touch. If they are cold and wet, the heating element has failed. Fortunately, replacing a heating element is a very simple repair.

Faulty Vent Motor or Fan

If dishes are warm after the dry cycle, inspect the vent and motor in the door of the dishwasher. These components push out the hot, moist air circulating during drying. If the fan or motor have failed, the moist air will still vent, but not as efficiently. As such, moist air can become trapped inside and settle back on the dishes.


Visit Fred’s Appliance Academy to learn more about the training provided in appliance repair.

Special thanks to Fred’s Appliance Academy for this helpful tip!

Want more tips? Click here to see all electronics and appliance tips!


CE Tech Tips — December 2020

**NOTICE**
Due to the danger and complexity of electronic equipment repair, the following technical tip is intended for professional reference only. Please refer to manufacturer’s recommendations as Encompass does not guarantee the accuracy, reliability or safety of this information.

Hitachi TV, 57S710S
Reason for Service: Using HDMI connection,
black picture with no Sync on OCD.
Solution: Clean HDMI jack with 99.8% isopropyl alcohol.

JVC TV, JLC32BC3002
Reason for Service: When set turned on, JVC logo appears,
then sound but no backlights.
Solution: Found shorted D602 on power supply board. MUR460

LG TV, 32LP1DC
Reason for Service: No audio
Solution: Replaced main board.

Samsung TV, PN64D80000FF
Reason for Service: Relay clicks on and off.
Solution: Resoldered TS801s and TC802s on power board.

Samsung TV, LN46C550JIFXZA
Reason for Service:  Set won’t come on, red LED blinks continuously.
Solution: Disconnect LVDS cable; if set comes on with melody, it’s either bad T-con or panel. Reconnect LVDS and unplug cables from T-Con to panel. If set comes on, panel is bad.

Sanyo TV, DP50749
Reason for Service: Power cycles on and off.
Solution: Replaced IC5750 on main board.

Sony TV, KDL46V2500
Reason for Service: Dead set, four red blink error.
Solution: Check all inverter transformers and their associated sm resistors.


Want more tips? Click here to see all electronics and appliance tips!


CE Tech Tips — November 2020

**NOTICE**
Due to the danger and complexity of electronic equipment repair, the following technical tip is intended for professional reference only. Please refer to manufacturer’s recommendations as Encompass does not guarantee the accuracy, reliability or safety of this information.

LG TV, 47LS4500-UD
Reason for Service: No picture and no backlight.
Solution: Found D607 shorted in the power supply.  MUR460AX

Samsung TV, PN51D6500D
Reason for Service: Set shuts down, or clicks on and off, has picture and splash screen every 5 or 6 seconds.
Solution: Replacing main board fixed this set. BN94-04728A

Samsung TV, LN40A500T1FXZA
Reason for Service: Set comes on, then as it warms up, picture problems, then shuts down.
Solution: Check for bad caps, C102 and C131 on main. 

Sharp TV, LC60LE650U
Reason for Service: Dead set, no standby.
Solution: Replaced shorted IC7903, (A6069H), and opened R7900, 0.22 ohm fusible.

Sony TV, KDL46W4100
Reason for Service: Backlights come on, then turn off within few seconds with 14 blink error.
Solution: Found and replaced 7A open fuse on LCD controller module.

Toshiba TV, 32HL67U
Reason for Service: At turn on, screen lights up for second, then dims way down; sound okay.
Solution: Replacing T-Con fixed set.

Vizio TV, VP422HDTV10A
Reason for Service: Dead, no standby 5V or amber logo.
Solution: Found open cap in power supply, C8006.  22uF/450V.  Replacing fixed set.


Want more tips? Click here to see all electronics and appliance tips!


Whirlpool All-in-One Washer Dryer Not Spinning

**NOTICE**
Due to the danger and complexity of electronic equipment repair, the following technical tip is intended for professional reference only. Please refer to manufacturer’s recommendations as Encompass does not guarantee the accuracy, reliability or safety of this information. 

Issues with the drum not spinning are among the most common faults with the Smart All-In-One Washer & Dryer from Whirlpool. While this guide is primarily focused on model #WFC8090GX0, many of the following tips may provide dryer repair solutions for the following front-loading Whirlpool models too:

WED5620HW WHD5090GW
WHD560CHW CED9150GW
WGD5620HW WHD862CHC

WED6620HW WED8620HW
WED560LHW WGD8620HW
WGD6620HW WED9620HC

Common Reasons for Whirlpool Dryer Drum Not Spinning

The most likely reasons for a Whirlpool Smart All-In-One Washer & Dryer to stop spinning are:

  • Problems with power connections to drum
  • Blockage preventing spinning
  • Motherboard computer connection issues
  • Issues with drum’s drive belt and motor
  • Fallout from overheating
  • Washer & Dryer cycle not starting

When attempting to repair, first check the status of the machine via the Scan-to-Connect technology and app. In many cases, the app can use automated diagnostics to provide an error code, saving a lot of time troubleshooting. If this hasn’t helped identify the issue or you’re not using the app, the following are some typical problems:

Drive Belt Broken

Faulty drive belts are the most common reason for drums to stop spinning. The easiest way to test this is to open the drum and turn it by hand. A healthy drive belt should provide some resistance (although it should turn) as it is spun. If there is no resistance, the drive belt is the main reason the drum is not turning.

Turn off the appliance and remove the lid to see whether the belt has snapped or come loose. If the latter, simply refit to fix. However, if the drive belt comes loose a second time, further support is needed. If the drive belt has snapped, a replacement part will be needed.

Idler Pulley Faulty

When the drive belt works but there is no tension, the idler pulley may have become damaged due to wear and tear. It is located in the dryer cabinet of the unit and should spin freely when tested by hand. If it is bent, broken or damaged, it will need replacing with part 279640.

Breaker Tripped

Whirlpool electric dryers use two power breakers to work. While they are designed to trip simultaneously, it is possible for only one to trip,  leaving the unit turning on, but not functioning. Try switching off the breakers for one minute to allow the unit to reset to solve the problem.

Alternatively, in rare cases, the power supply might not be sufficient enough to help the unit function. Therefore, a replacement power cord #PT220L may solve this commonly overlooked problem.

Drum Obstructed

If the drum is obstructed, it physically won’t turn despite all other parts working. This can be caused by loose items falling out of clothing and getting caught in the unit. Complete the same manual turning test used for checking the drive belt. If the drum won’t turn at all or is particularly stiff, an obstruction is likely.

The foreign objects will usually lodge between the drum and the housing of the unit.  Needle nose pliers can help manually remove the objects before spinning the drum to check that the obstruction is fully removed.

Drum Rollers Faulty

The drum relies on several drum rollers to provide a smooth operation as it turns. With the appliance switched off and the lid open, each of the rollers should spin without resistance when turned by hand. If any of them are not spinning properly or have visible signs of severe wear, they need replacing. It is possible to purchase a replacement for the individual roller or use a kit to replace them all.

Drive Motor Overheated

When the motor used to power the spin cycle overheats, it may stop the drum from spinning entirely or it may cause an intermittent performance, which is equally problematic as laundry won’t dry. Replacing this part is usually best left to an expert.

Face Panel Buttons Aren’t Working

The digital screen on the face panel provides a convenient way to set the various modes on the washer-dryer. If you cannot start a cycle or change the settings to the right dry mode, the buttons may not be connecting to the main computer. Even when there is resistance after pushing the button, an investigation is needed.

Turning the appliance off at the breaker may reset the digital buttons to fix the issue. If this doesn’t work, unscrew the panel and check for debris or signs of worn switches.

Thermal Fuse Failed

Thermal fuses are a safety mechanism that, if blown, will stop the drum from turning. Remove the back panel and use a multimeter to run a consistency test. Replacing the thermal fuse is easy, but you need to check whether overheating is the root cause. If it is, failure to treat the issue will result in the new thermal fuse blowing very quickly.

When completing this task or any other, it’s vital to check that the drum is back in position and that the washer-dryer is level. If the issues persist a professional dryer repair service can usually get it operating again without the need to replace your entire unit.


Visit Fred’s Appliance Academy to learn more about the training provided in appliance repair.

Special thanks to Fred’s Appliance Academy for this helpful tip!


CE Tech Tips — October 2020

**NOTICE**
Due to the danger and complexity of electronic equipment repair, the following technical tip is intended for professional reference only. Please refer to manufacturer’s recommendations as Encompass does not guarantee the accuracy, reliability or safety of this information.

Emerson TV, LF501EM4
Reason for Service: Dead set, no standby power light.
Solution: Removed the I/R board and found SM C4056 shorted.  Removing bad cap restored normal operation to the set.

Hitachi TV, 57F59A
Reason for Service: Changes colors, snowy picture, loss of one or more colors, all white and shuts down.
Solution: Replace signal board and make sure the firmware is updated. 

LG TV, 47LM6700
Reason for Service: Dead, 3 blink error.
Solution: Replaced a shorted D607.  MUR460

Panasonic TV, TCP42X5
Reason for Service: Dead
Fix: Replaced U203 on backside of Power board.  FAN6755UWMY.

RCA TV, LED46C45RQ
Reason for Service: Set won’t power up.
Solution: Replacing the EEPROM fixed the set.  U16

Samsung TV, PN64E8000GFXZA
Reason for Service: Dead set, fuse blown.
Solution: Repaired power board by replacing QS802 & QS804.  Examine whole board for bad solder and resolder as necessary.

Vizio TV, E390-A1
Reason for Service: LED backlights will not come on.
Solution: Replacing IC U403 fixed the set.

Zenith, 9-1302 module
Reason for Service: Dead, nothing.
Solution: Resoldered jumper next to Elect Cap CX3452.  Fixed set.

Want more tips? Click here to see all electronics and appliance tips!


Fixing Problems with Hotpoint Freezers

**NOTICE**
Due to the danger and complexity of electronic equipment repair, the following technical tip is intended for professional reference only. Please refer to manufacturer’s recommendations as Encompass does not guarantee the accuracy, reliability or safety of this information. 

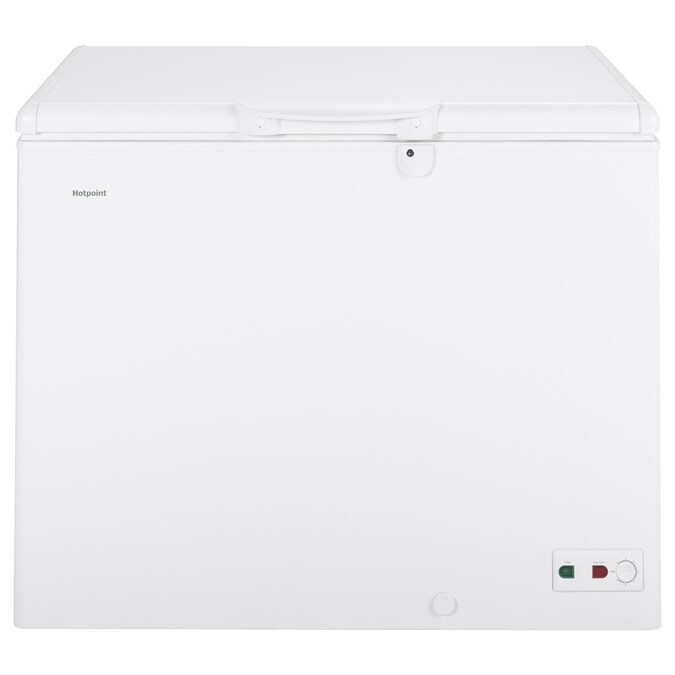
To the non-technical person, freezers seem like complicated units capable of doing something quite extraordinary – lowering temperatures below that of the surrounding. Happily, though, they work on elementary principles. Hotpoint freezer repair usually involves replacing broken or defective parts or doing simple troubleshooting.

This guide will cover the following Hotpoint freezer models and related products from the brand:

HQ9 B1L

HQ9 E1L

H9T 921T KS H

H7T 911T KS H

H7T 911T MX H

H7T 911A KS H AQUA

H7T 911A MX H AQUA

H5T 811I MX H

LAL85 FF1I W WTD.1

HM 7030 E C AA O3.1

DC 85 N1 G

DC 85 N1 W

H3T 811I OX

H3T 811I W

H8 A1E SB UK.1

H8 A1E W UK.1

H8 A1E SB WTD UK.1

FFU4D.1 K


Common Reasons for Hotpoint Freezer to Stop Working Properly

Freezers can stop freezing (or generate readouts that make it appear as though they’ve stopped working), for many reasons, including:

  • Dirty condenser coils
  • Frosted over coils
  • Main control board malfunction
  • Defective temperature control thermostat
  • Faulty user control board
  • Defective compressor unit
  • Sealed system leak
  • Start relay problems
  • Evaporator motor fan issues

Dirty Condenser Coils

Hotpoint makes freezers with both external and internal condenser coils. The interior models shouldn’t require regular cleaning since the shroud of the unit prevents accumulation of dirt and grime. However, exterior types often collect dust, lowering their capacity to dissipate heat and reduce interior temperatures. If freezer coils look dirty, unplug the unit and wipe off any dust with a duster or cloth. If they feel sticky or greasy, use a damp sponge with a decreaser to remove scum.

Frosted Over Evaporator Coils

Sometimes freezer evaporator coils can frost over. This usually occurs when there is a problem with the defroster heater – a device that prevents buildup of frozen water on the surface of coils.

coming soonHook the defroster heater up to a multimeter and check for continuity. The current flow through the unit should be continuous while the freezer unit is switched on. Lack of continuity could indicate problems with electrical connections, fuses, switches and wiring elsewhere in the appliance.

If continuity is an issue, the entire defrost heater unit may need to be replaced.

Main Control Board Malfunction

Main control boards on Hotpoint freezers provide all circuitry required to adjust temperatures and settings. The brand supplies an extensive range of different boards, depending on model.

Mainboard issues can cause a freezer to stop freezing, but such problems are uncommon. If other potential issues have been ruled out, try replacing the mainboard to see if it fixes the problem.

Defective Temperature Control Thermostat

The temperature control thermostat measures temperature inside the freezer to change voltage supplied to the condenser fan motor, evaporator fan motor and compressor. When thermostats malfunction, they can’t assess temperatures accurately and send instructions to the components to chill the freezer to the required level.

If a defective thermostat is suspected, turn it from the lowest setting to the highest. On Hotpoint models, you should hear a click as components in the rest of the appliance kick into action.

If you don’t hear any sound or see the machine responding, take a multimeter and test the thermostat for continuity. If the thermostat doesn’t have continuity, it should be replaced.

Defective Compressor Unit

Compressors are just pumps that circulate refrigerant through the condenser and evaporator coils. When they stop working, heat exchange comes to a halt, and freezers can’t cool down.

Compressors can fail on modern Hotpoint machines, though this is rare. Often, other defective parts are causing the issue. Before replacing or repairing the compressor, check other components such as the evaporator and condenser coils and evaporator fan motor.

If those components appear to be working well, then test the compressor itself by attaching a multimeter to the electrical connector pins on either side. If you detect an open circuit, then the compressor is probably defective and should be replaced. (Please note that only licensed technicians should replace compressors.)

Sealed System Leak

If the unit freezes on the top shelf but nowhere else, there may be a sealed system leak. Replacing a sealed system usually costs more than the freezer unit itself, making repair cost-prohibitive.

Start Relay Problems

The freezer start relay is a device that switches the compressor on and off. When it doesn’t work correctly, it doesn’t supply energy to the compressor in sufficient quantities or at the right time. If the compressor doesn’t work, the freezer won’t cool at all.

If an issue with the start relay is suspected, unplug the freezer from the mains and detach it from the compressor. As with other electrical components described above, use a multimeter to test for continuity between both terminals on the relay. Also, smell the unit; if there’s a burning odor, it needs to be replaced.

Problems With Evaporator Motor Fan

Evaporator motor fans are critical for heat exchange, which makes refrigeration possible. Fans circulate air through the coils in the freezer, removing excess heat.

Most Hotpoint models disengage the evaporator motor fan when the door is opened. If there’s a problem with the fan, try pressing the freezer door microswitch that operates the fan and keep the door open. The freezer should detect a rise in temperature and prompt the fan to start spinning. If it doesn’t respond, you may need to replace it.

Please note that readouts on the user display board may not be accurate if sensors or internal circuits have failed.


Visit Fred’s Appliance Academy to learn more about the training provided in appliance repair.

Special thanks to Fred’s Appliance Academy for this helpful tip!


CE Tech Tips — September 2020

**NOTICE**
Due to the danger and complexity of electronic equipment repair, the following technical tip is intended for professional reference only. Please refer to manufacturer’s recommendations as Encompass does not guarantee the accuracy, reliability or safety of this information.

Hitachi TV, 60SX2K
Reason for Service: Red convergence no good, can’t adjust.
Fix: Replaced IC-1301 and checked R1303, R1304, R1313, R1314.

LG TV, 32LC70
Reason for Service: Turns on and off intermittently.
Solution: Replacing cable from power supply to the main fixed set. EAD60958303

LG TV, 32LG3DC
Reason for Service: No picture, sounds works intermittently.
Solution: Replacing Q709 fixed set.

Pioneer TV, PRO506PU and Media Receiver, PROR06U
Reason for Service: Shuts down with 12 blink error on media receiver.
Solution: From Pioneer: Replace MR DTB Assy in media receiver.  #-AWE1305

Samsung TV, UN40C5000QF
Reason for Service: Set won’t start, 6 blink error code.
Solution: Replaced audio IC1202 on main board.

Samsung TV, HPS5073X
Reason for Service: If set is cool, takes longer and longer to turn on – as much as 15 minutes.
Solution: Replaced caps in power supply. CS856, CS846

Sylvania TV, LD320SS1
Reason for Service: While watching set, started flashing colored screens, couldn’t stop even by unplugging. When set started up again, had same problem: Test mode.
Solution: With set on, press left arrow then right arrow on the remote to exit.  Some sets you have to press up arrow then down arrow.