Author - wpengine

CE Tech Tips — March 2023

**NOTICE**
Due to the danger and complexity of electronic equipment repair, the following technical tip is intended for professional reference only. Please refer to manufacturer’s recommendations as Encompass does not guarantee the accuracy, reliability or safety of this information.

Hitachi TV, 53FDX20B
Reason for Service: Weak or washed out color when OSD color adjusted.
Solution: Found and replaced shorted ZD-306.

LG TV, 50PS60UA
Reason for Service: Bottom half of picture is black.
Solution: Replacing lower buffer fixed set. 

Samsung UN60EH6000F
Reason for Service
: Backlights come for just a second, then go back off.
Solution: Replacing power board fixed set. Saw some bad caps on power board.

Samsung TV, LN52B530P7FXZA
Reason for Service: Sound okay, but no picture.
Solution: Replace C1804, (box cap) on IP board. 684k/400V.

l

Sharp TV, LC60C8470U
Reason for Service: Error code, two long, two short.
Solution: Found bad 4 pin regulator Q7120 under heat sink. Replacing fixed set.

Sony TV, KDS60A2000
Reason for Service: Dead set, five blink code.
Solution: Replacing ballast fixed set.

Vizio TV, M471I-A2
Reason for Service: Dead set.
Solution: Found and replaced shorted diode in power supply. D950.

Vizio TV, E320-A0
Reason for Service: Dead set.
Solution: Found open SM 5A fuse on mother board, and one of three ceramic caps near fuse was shorted to ground. Removed cap.

Want more tips? Click here to see all electronics and appliance tips!


How Dryer Balls Work

**NOTICE**
Due the danger and complexity of electronic equipment repair, the following technical tip is intended for professional reference only. Please refer to manufacturer’s recommendations as Encompass does not guarantee the
accuracy, reliability or safety of this information. 

Dryer balls are great for helping reduce laundry drying time. Unlike other drying aids like dryer sheets and fabric softeners, dryer balls don’t contain any harsh chemicals, which make them much better for sensitive skin, as well as the environment. Additionally, unlike liquid softeners and disposable sheets, dryer balls can last for years depending on how often they’re used.

Dryer balls can be used with most hearty fabrics like linen, cotton and polyester. Avoid using them with delicates as they could cause damage. Dryer balls can be washed by hand in hot soapy water or in the washing machine with other laundry items. Before using them again, make sure they are completely dry or they won’t work properly.

Here’s some other helpful information on how dryer balls work and the benefits:

Keep Laundry Separated

The main function of dryer balls is to keep laundry separated during the drying cycle. They bounce around the dryer drum, which helps create gaps between clothes and other laundry items. This enables hot air to better circulate, reducing both drying time and energy costs.

Absorb Moisture

The best dryer balls are made from wool, which helps them absorb moisture from wet laundry, leading to faster drying.

Soften Fabrics

While dryer balls bounce around, they help soften laundry fabrics by gently moving against and through them. This also helps remove wrinkles from clothing.

Reduce Static

Ever felt an unpleasant electric shock when removing clothes from the dryer? Dryer balls help reduce static by moving through laundry items.

Reduce Lint

Lint can develop in the dryer from laundry friction, which is minimized by dryer balls keeping items separate.

How to Use Dryer Balls

For best results, follow these steps:

  1. Add essential oil: Use a few drops of aromatic essential oils directly on dryer balls for a fresher laundry scent.
  2. Use multiple dryer balls: Throw in two to four dryer balls depending on load size.
  3. Start dryer: Once dryer starts, dryer balls will do their thing.
  4. Take them out: After drying cycle, remove dryer balls and store elsewhere.


Special thanks to Fred’s Appliance Academy for this helpful tip.

LG Dishwasher Error Codes

**NOTICE**
Due the danger and complexity of electronic equipment repair, the following technical tip is intended for professional reference only. Please refer to manufacturer’s recommendations as Encompass does not guarantee the
accuracy, reliability or safety of this information. 

The AE error code showing on an LG dishwasher indicates there is a leak inside the unit, which activates the float switch. Sometimes this error code can be easily resolved just by  resetting the dishwasher or changing detergents. If the code remains after trying these tactics, there may be an issue with internal components.

This guide applies to all major LG dishwasher models, including:

LDF6810BB
LDF6810ST
LDF6810ST/01
LDF6810WW
LDF6920BB
LDF6920ST
LDF6920WW
LDF7551ST
LDF7774ST
LDF7810BB
LDF7810ST
LDF7810WW
LDF7811BB
LDF7811ST
LDF7932ST
LDS4821BB
LDS4821ST
LDS4821WW
LDS5540ST
LDS5811ST
LDS5811WW

Step 1 – Reset Dishwasher

Start by doing a simple reset of the unit. Sometimes the error code is showing due to a glitch or issue with control board. To reset, turn power off for 10 minutes and then turn back on again. Continue to next step if error code does not go away at this time.

Step 2 – Look for Water in Drain Pan
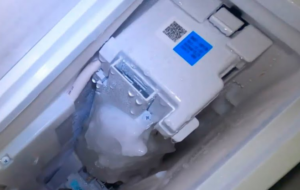
The AE error code appears when the float sensor detects too much water in the bottom of the dishwasher. Use a heavy towel to soak up any water found in the drain pan and check to see if the error code has disappeared. If not, continue to next step.

Step 3 – Check Cleaning Detergent

Unless using pods or tablets — which usually include the right detergent amount — double check to ensure use of high-efficiency (HE) detergent. Any other type of detergent will cause too many suds to form in the dishwasher drum, causing a water leak. Try changing to HE detergent, if needed, and check the error code again.

Step 4 – Check Dishwasher Spray Arms

Dishwashers have multiple spray arms that distribute water through the unit. If the arms get blocked or moved out of position, water can leak out through the door.

Follow these instructions to check the spray arms:

  1. Remove all spray arms and check for any debris that could be blocking the water holes by running water through them. Use piece of wire to remove any blockages.
  2. Return spray arms to former positions.
  3. Check to see if AE error code still showing.

Step 5 – Check Door Gasket

A defective door gasket is another potential cause of a water leak. The door gasket or “seal” fits around the dishwasher door to prevent leaks. To check the seal:

  1. Open dishwasher door.
  2. Carefully inspect door gasket/seal for any damage and replace if necessary.
  3. If it looks to be in good condition, clean with hot soapy water to remove any debris that could prevent door from closing properly.
  4. After replacing or cleaning door gasket, check to see if error code still showing.

Step 6 – Check Water Inlet Valve

The water inlet valve, which opens and closes for water to flow through the dishwasher, can fail and fill up the unit with too much water. Here’s how to check the valve:

  1. Check to see if water is leaking from valve. If so, it will need to be replaced.
  2. If no leaks, turn water supply off and then remove hose and check filter and hose for leaks.
  3. If any components are damaged, replace them.
  4. Continue to next step if the error code still shows.

Step 7 – Check Float Sensor

The float sensor monitors the dishwasher’s water level. If it fails, too much water may flood the dishwasher and cause leaking. The float sensor can be removed and tested with a multimeter. If faulty, it will need to be replaced.

Follow these instructions to check the float sensor:

  1. Turn off power and water supply to dishwasher.
  2. Remove float sensor from dishwasher bottom.
  3. Test with multimeter. If it has continuity, reattach to dishwasher and move to next step.
  4. If no continuity, replace it and check the error code again.

Step 8 – Inspect Control Panel 

The final option is to evaluate the control panel, which typically will need to be replaced if faulty.


Special thanks to Fred’s Appliance Academy for this helpful tip.

CE Tech Tips — January 2023

**NOTICE**
Due to the danger and complexity of electronic equipment repair, the following technical tip is intended for professional reference only. Please refer to manufacturer’s recommendations as Encompass does not guarantee the accuracy, reliability or safety of this information.

LG TV, 60PV25
Reason for Service: Solarized picture.
Solution: Found lots of bad solder on Y & Z sus boards and in power supply. Check and resolder as necessary.

Samsung, LN32C540F2DXZA
Reason for Service: Won’t turn, no functions.
Solution: Discovered bad CM808 in power supply. 018uF/1KV

Samsung PN64D7000
Reason for Service: Splash screen continually cycles.
Solution: Replaced flash chip on main, IC1302. Verify by freeze spraying.

Samsung, UN55D6000DF
Reason for Service
: Set won’t start, but has standby light.
Solution: Reflowing BGA on main fixed set. IC1001

Sony TV, RA6 chassis
Reason for Service: Relay clicks, 6 blink error.
Solution: Found shorted D5002 on G board. Replacing fixed set.

Toshiba, 40G300U1
Reason for Service: Power button turns logo on, but nothing else works.
Solution: Replaced 7A fuse on inverter board and Q303.

Toshiba TV, 55SV670U
Reason for Service: Dead set.
Solution: Replacing R850 on power board fixed set. 1.8ohm/5W

Zenith TV, Z50PV220
Reason for Service: Top half of picture missing.
Solution: Replacing lower Y-buffer fixed set.

Want more tips? Click here to see all electronics and appliance tips!


How to Easily Defrost Samsung Fridge

**NOTICE**
Due the danger and complexity of electronic equipment repair, the following technical tip is intended for professional reference only. Please refer to manufacturer’s recommendations as Encompass does not guarantee the
accuracy, reliability or safety of this information. 

Defrosting the ice maker of a Samsung refrigerator is typically all that’s needed to get it working again.  Defrosting should also be performed when ice builds up on the condenser coils and water leaks. It’s a simple job; below are a couple of ways to defrost an ice maker, along with useful information on maintaining the unit.

This tip covers these Samsung refrigerator models:

RB217ABPN

RF217ACPN

RF217ACRS

RF266ABPN

RF266AEPN

RF267ABRS

RF267AERS

RF268ABRS

RF4287HARS

RF4287HARSXAA

RFG297AARS

RFG298HDRS

RS2530BBP

RS2630SHXAA

RS2630WWXAA

RS265TDRS

RS267LABP

RS267LASH

RS269LARS

RS2777SL

RSG257AARS

Reset Ice Maker

The first method to defrost a Samsung ice maker is to reset it. When reset, the ice maker goes into a defrost cycle, which removes any ice that’s built up in the unit.

Here’s how to do it:

1. Remove ice bucket from unit.

2. Locate Test button and press down until it chimes.

3. Ice maker should go into test cycle and defrosting mode.

4. Reinstall ice bucket at start of next cycle so it can collect any water.

5. Once cycle ends, it will chime again, which means ice maker can be used again.

Forced defrost method

If the reset method doesn’t work, try the forced defrost mode, which should clear the ice that has built up in the unit.

1. Find and press Power Freeze and Lighting buttons. If fridge doesn’t have power freeze button, press Energy Save instead.

2. Hold both buttons down for five seconds.

3. Next, press “lighting” button until “fd” displays. Appliance will go into forced defrost mode.

4. Wait approximately 30 minutes for cycle to end.

5. Once cycle ends, wipe ice maker to remove any water. The unit should now be defrosted and ready to use again.

Maintaining Samsung Ice Maker

To help prevent an ice maker from frosting over again and also increase its lifespan, try these tips:

  • If any visible frost on ice maker, use cloth or scraper to remove.
  • Check ice maker weekly and defrost again if needed.
  • Turn off ice maker when not being used. This minimizes buildup and saves energy.
  • Regularly clean rubber seals in ice bucket to prevent frost and other debris from building up.

Samsung Ice Maker FAQ

Why do I need to do a forced defrost of my Samsung ice maker?

Forced defrosting is needed when ice makers become frosted over and don’t operate correctly. This is usually caused by a blocked vent, faulty defrost heater or timer, or dirty condenser coils. Before putting the ice maker in a forced defrost cycle, fix the underlying problem.

What error codes on my Samsung refrigerator relate to the ice maker?

Error codes appear on the refrigerator’s display screen when something is wrong with one of its components. The following error codes apply to the ice maker:

  • 5E – Fridge defrost sensor error.
  • 8E and 14E – Problem with ice maker sensor.
  • 33E – Problem with ice pipe heater.
  • 39E and 39C – Ice maker function error.
  • 40E and 40C – Problem with ice maker fan.
  • 84C – Problem with compressor lock.

How long does it take to defrost my Samsung ice maker?

The forced defrost cycle takes about 30-60 minutes. Turning off the ice maker off can take up to 24 hours to fully defrost.

How often should I defrost my ice maker?

If the ice maker is used regularly, it should be defrosted monthly. If it’s not used very often, it can be defrosted every 3 months. However, if it’s every found to be covered in frost, it should be defrosted immediately. To help maintain the ice maker, check it weekly just to make sure no frost has built up on the unit.


Special thanks to Fred’s Appliance Academy for this helpful tip.

Deciphering Bosch Dishwasher Error Codes

**NOTICE**
Due the danger and complexity of electronic equipment repair, the following technical tip is intended for professional reference only. Please refer to manufacturer’s recommendations as Encompass does not guarantee the
accuracy, reliability or safety of this information. 

Bosch dishwashers feature an internal diagnostic system that automatically identifies problems with its various components. This guide reviews the error codes you may encounter and how to resolve for these Bosch models:

GM926710

SHE44C05UC/20

SHE44C06UC/17

SHE46C02UC/17

SHE46C05UC/17

SHE46C05UC/22

SHE46C06UC/17

SHE55M05UC/50

SHE55M05UC/52

SHE55M05UC/53

WFW97HE

SHE56C02UC/17

SHE56C02UC/18

SHE56C05UC/17

SHE56C06UC/17

SHE56C07UC/17

SHI4302

SHI4306

SHI6802

SHI6805

SHI6806

Bosch dishwasher error code E1 or E2

What it means:

Both error codes signify an issue with the temperature sensor or thermistor.

How to fix:

Start by resetting dishwasher: turn it off for five seconds and turn on again. If this doesn’t work, check sensor with multimeter to ensure continuity. If it fails, sensor must be replaced.

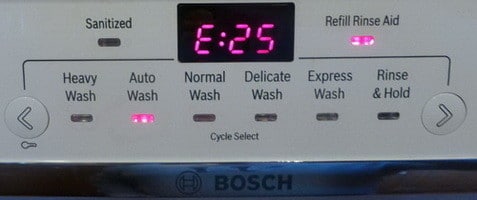
Bosch dishwasher error code E3

What it means:

Dishwasher unable to fill with enough water.

How to fix:

Start by turning off water supply and then power. Look for any bends or cracks in water hose to see if it’s blocked or obstructed. Disconnect hose to make sure it’s not blocked. If it is, unblock and then reconnect hose. If hose working correctly, check water inlet valve and replace if necessary.

Bosch dishwasher error code E4

What it means:

Problem with water flow sensor.

How to fix:

Start by resetting your dishwasher by turning it off and then back on after five seconds. If that doesn’t work, the water flow sensor will need to be tested, and if faulty, replaced.

Bosch dishwasher error code E5

What it means:

Dishwasher filling up with too much water. Most common reason is faulty float switch.

How to fix:

Reset dishwasher by turning it off for five seconds and then back on. If this doesn’t work, test float switch for continuity and replace if not working.

Bosch dishwasher error code E6

What it means:

Faulty aqua sensor.

How to fix:

Reset dishwasher by turning it off for five seconds and then back on. If error code still showing, test aqua sensor for continuity. Replace aqua sensor if defective.

Bosch dishwasher error code E9

What it means:

Heating element problem.

How to fix:

Reset dishwasher by turning it off for five seconds and then back on. If this doesn’t work, test heating element for continuity. Replace if not working, and also if it’s cracked or damaged in any way.

Bosch dishwasher error code E15

What it means:

Water leak causing flood sensor to activate.

How to fix:

If no water seen on floor, error code may be mistake. Reset dishwasher by turning it off for five seconds and then back on. If this doesn’t work or water is on floor, find source of  leak, which most likely caused by defective hose or cracked inlet valve or connection.

Bosch dishwasher error code E22

What it means:

Blocked filter causing excess water to build up in sump.

How to fix:

Reset dishwasher by turning it off for five seconds and then back on. If that doesn’t work, remove filter from dishwasher (usually found at bottom of dishwasher). Thoroughly clean filter before returning to unit. Turn appliance off and then on and check code again.

Bosch dishwasher error code E24 or E25

What it means:

Both codes indicate problem with dishwasher drainage system.

How to fix:

Reset dishwasher by turning it off for five seconds and then back on. If that doesn’t work, turn dishwasher on to drainage cycle and listen to sounds made. Humming noise indicates faulty drain pump impeller. Test the part and replace if faulty. If dishwasher not trying to drain at all, drain pump needs to be tested and replaced if defective.

Bosch dishwasher error code H24

What it means:

24-hour delay.

How to fix:

Reset dishwasher by turning it off for three minutes and then back on. Then, press start button for 10 seconds to further reset dishwasher computer. After 10 seconds, error code should disappear and dishwasher ready again.

Special thanks to Fred’s Appliance Academy for this helpful tip.

CE Tech Tips — December 2022

**NOTICE**
Due to the danger and complexity of electronic equipment repair, the following technical tip is intended for professional reference only. Please refer to manufacturer’s recommendations as Encompass does not guarantee the accuracy, reliability or safety of this information.

LG TV, 60PV25
Reason for Service: Solarized picture.
Solution: Found lots of bad solder on Y & Z sus boards and in power supply. Check and resolder as necessary.

Samsung, LN32C540F2DXZA
Reason for Service: Won’t turn, no functions.
Solution: Discovered bad CM808 in power supply. 018uF/1KV

Samsung PN64D7000
Reason for Service: Splash screen continually cycles.
Solution: Replaced flash chip on main, IC1302. Verify by freeze spraying.

Samsung, UN55D6000DF
Reason for Service
: Set won’t start, but has standby light.
Solution: Reflowing BGA on main fixed set. IC1001

Sony TV, RA6 chassis
Reason for Service: Relay clicks, 6 blink error.
Solution: Found shorted D5002 on G board. Replacing fixed set.

Toshiba, 40G300U1
Reason for Service: Power button turns logo on, but nothing else works.
Solution: Replaced 7A fuse on inverter board and Q303.

Toshiba TV, 55SV670U
Reason for Service: Dead set.
Solution: Replacing R850 on power board fixed set. 1.8ohm/5W

Zenith TV, Z50PV220
Reason for Service: Top half of picture missing.
Solution: Replacing lower Y-buffer fixed set.

Want more tips? Click here to see all electronics and appliance tips!


PT Holdings Rebrands as Parts Town Unlimited, Announces Leadership and Organizational Changes

New brand and structure will support accelerated growth and innovation

ADDISON, Il., Dec. 5, 2022 – PT Holdings, the parent company of Parts Town, a global leader in high-tech distribution of foodservice equipment parts, residential appliance parts, HVAC parts, and related products, today unveiled its new brand, Parts Town Unlimited. In addition, the company has announced a number of organizational changes to further accelerate growth and innovation. Parts Town Unlimited includes 45 unique brands across multiple divisions with nearly $2 billion in annual revenue and over 4,500 team members worldwide. The group is primarily focused on high-tech distribution of mission-critical replacement parts and related products.

The reorganization will support Parts Town Unlimited’s growth strategy, which includes a rapidly expanding product offering and global reach. The company will continue to emphasize digital leadership, operational excellence, and long-term high integrity partnerships, supported by its relentless focus on core values, people, and culture.

“Many companies include the acronym ‘LLC’ after their name, where the first ‘L’ stands for limited. We are going a different direction and focusing on the unlimited growth potential of our business: we are a town without limits,” said Steve Snower, Town Troublemaker (aka CEO), Parts Town Unlimited. “Over the past 19 years of our growth journey, we have updated our organization structure many times. Updating our brand and implementing these leadership changes will position the business for rapid growth in the coming years. We look forward to an exciting future.”

Overview of Parts Town Unlimited
Parts Town Unlimited includes the following divisions:

  • Parts Town, the technology innovator and market-leading distributor of original equipment manufacturer (OEM) foodservice, residential appliance, and HVAC equipment replacement parts. Also known as “Parts Town Americas,” this divisionprimarily serves the U.S., Canada, and Latin America, along with select customers in other international markets.
  • Red Lightning Group, a division that focuses solely on technology innovation to support the foodservice industry and beyond, serves as an incubator to help innovative “Townspeople” bring their ideas to life. Red Lightning Group developed the technologythat underpins Parts In Town, an ecommerce solution designed to help local service companies and distributors grow their businesses, improve equipment up-time by providing quick pickup and delivery of parts in the foodservice industry, and promotegrowth of genuine OEM part sales locally. Red Lightning Group also developed the Parts Town Marketplace, which provides customers an online, one-stop shopping experience for OEM parts beyond the foodservice category, as well as items and products across a
    variety of new categories, eliminating the need for customers to visit multiple websites to find the parts and related products they need.
  • Parts Town Home, the company’s fastest growing capability, includes residential appliance parts, HVAC parts, and consumer electronics parts primarily through its Encompass brand. Parts Town Home has rapidly grown to represent 15% of Parts Town Unlimited’s 2022 revenue, compared to just 3% in 2021.
  • Parts Town Europe, which serves Europe and other international markets through its REPA Group brands, GEV Group, LF Group, EPGC, Atel, and Big Warehouse. Parts Town Europe includes locations across Europe in addition to a presence in both Australia and China.
  • Parts Town UK, which serves the UK through First Choice and Commercial Catering Spares brands.
  • Unlimited Service Group, which supports several local parts and service companies that partner with leading manufacturers in the U.S. and Canada. Individual, local brands will continue to be emphasized, reflecting the unique histories, cultures, expertise, and local focus of each of these businesses.

Leadership Moves
As part of the reorganization, Steve Snower will be focusing his role on group CEO responsibilities, with Clint Holder appointed to the role of Group President, Parts Town Americas. This will allow Snower to lead Parts Town Unlimited’s strategy, drive the company’s vision for growth and innovation, accelerate its acquisition efforts, and build on its unique culture.

“Clint has done an incredible job building unique, high integrity partnerships across the industry. Under his commercial leadership, we have dramatically expanded our master distribution capability and deepened our partnerships with service companies across the industry,” said Snower. “For the past 19 years, I have played the dual role of group CEO and President of Parts Town, and I am excited to turn the president role over to Clint to lead the business forward, allowing me to focus on building out the group vision.”

John McDonough has been named Chairman of Parts Town Europe. McDonough joined Parts Town Unlimited’s board of directors following Parts Town’s acquisition of Heritage Parts in 2019 and has remained an active advisor to the business. McDonough will now re-engage full-time and relocate to Munich, Germany, to partner with Alex Wiegand, CEO of REPA Group, in accelerating Parts Town Unlimited’s global reach.

“I am so excited that John will be a full-time partner in the business. His integrity and experience are unmatched,” said Snower. “As CEO of Heritage Parts, he led the digital transformation of the business and the full transition to genuine OEM parts. His presence with our team in Europe will make a huge impact.”

Miron Washington has been named Chief Digital Officer. He joins Parts Town Unlimited from Home Depot, where he held the role of Vice President of Customer Experience and General Manager of the company’s $3 billion Quote Center business unit. His previous experience includes digital leadership roles at Amazon, Staples, and Hewlett Packard. Washington will be charged with advancing the digital vision of Parts Town Unlimited.

Several other organization changes were announced, all with the intent to accelerate Parts Town Unlimited’s growth and innovation across its target markets.

About Parts Town Unlimited
Parts Town Unlimited is the global leader in high-tech distribution of mission-critical equipment replacement parts and related products and services for the foodservice, residential appliance and HVAC industries. Guided by its core values of Safety, Integrity, Community, Passion, Courage, and Innovation, Parts Town Unlimited delivers infinite possibilities, unlimited potential, and boundless innovation with a focus on people, innovation, and long-term partnerships. Parts Town Unlimited is an organization without limits, led by dreamers who continuously grow and bring value to our partners and amazing opportunities to our team members around the globe.

About Parts Town
Parts Town is the leading, technology innovation-driven distributor of genuine OEM (original equipment manufacturer) foodservice, residential appliance and HVAC equipment repair parts. When there’s a hiccup with any piece of equipment, Parts Town is ready to jump in and help with the most in-stock parts on the planet, innovative technology, and an unmatched customer experience. Customized solutions benefit equipment service technicians of all kinds, as well as chain and independent restaurants, schools, health care facilities and hospitality providers.

By partnering with the top manufacturers of foodservice, residential appliance and HVAC replacement parts, Parts Town improves the supply chain, increases sales of genuine OEM parts and keeps every customer’s business running like clockwork. Parts Town also partners with equipment and supplies dealers of all sizes to offer a one-stop-shop through its Parts Town marketplace.

For more information, visit https://www.partstown.com/.

Contact Information
Katie Whorton
katie.whorton@finnpartners.com
404-569-9901

Pressure Test Sealed System with Nitrogen

**NOTICE**
Due the danger and complexity of electronic equipment repair, the following technical tip is intended for professional reference only. Please refer to manufacturer’s recommendations as Encompass does not guarantee the accuracy, reliability or safety of this information. 

**NOTE: Working on refrigerator sealed systems is considered an advanced repair that should only be performed qualified, professional technicians.**

To check for leaks in sealed refrigeration systems, nitrogen can be used instead of air or water because it’s inert, odorless and has low moisture content.  Following are some basic steps for conducting a pressure test:

  1. Attach the service hose to the process stub on the compressor.
  2. Then, attach the service hose to the regulator on the nitrogen tank.
  3. Turn the nitrogen tank on check the PSI. A brand new tank should have about 2,000.
  4. Deliver nitrogen to the refrigerator by turning the T-handle to the right until reaching about 100 PSI. Turning the handle to the left will decrease pressure or turn it off.
  5. With nitrogen now pressurizing the system, check all joints for leaks. Large leaks should be heard on the suction line, but for smaller leaks, bubble testing is required.
  6. As nitrogen leaves the system and pressure further decreases, bubbles become smaller and smaller. The smaller the leak, the smaller the bubbles.

Please keep in mind when bubble testing, the system should always be pressurized. This helps prevent the solution from being drawn into the sealed system, as well as to show the bubbles.


Special thanks to Fred’s Appliance Academy for this helpful tip!

CE Tech Tips — November 2022

**NOTICE**
Due to the danger and complexity of electronic equipment repair, the following technical tip is intended for professional reference only. Please refer to manufacturer’s recommendations as Encompass does not guarantee the accuracy, reliability or safety of this information.

Samsung TV, HP-T5054
Reason for service: Panel doesn’t prime, but audio okay.
Solution: Replaced two FET’s on Y-board: Q5303 and Q5304. 

Samsung, LNT3232HX/XAA
Reason for Service: Backlights not working, but sound Ok.
Solution: Replaced 4 bad caps in power supply, CM851, CM852, CM856, CM858 and bad fuse F3 on inverter board.

Samsung TV, UN40JU6400
Reason for service: No video or audio and no backlight.
Solution: Found shorted cap off pin 8 of IC304. Just removed cap.

Samsung, UN46H6201AF
Reason for Service: Set has no video, but audio and backlight are okay.
Solution: Replaced  T-Con board.

Sony TV, RA6
Reason for service
: Dead set, 6 blink error.
Solution: Found D5004 on G board shorted.

Toshiba TV, 32TL515U
Reason for Service: No audio.
Solution: Reflowing BGA on main restored audio. IC100

Vizio, E550VL
Reason for Service: Has amber logo, but won’t turn on.
Solution: Replacing IC U14 fixed set.

Vizio TV, E422VA
Reason for service: No video or audio.
Solution: Reflowing BGA on main fixed set. U401

Want more tips? Click here to see all electronics and appliance tips!