Author - wpengine

CE Tech Tips — October 2022

**NOTICE**
Due to the danger and complexity of electronic equipment repair, the following technical tip is intended for professional reference only. Please refer to manufacturer’s recommendations as Encompass does not guarantee the accuracy, reliability or safety of this information.

Hisense TV, LTDN46V86US
Reason for Service: Set won’t start, intermittently.
Solution: Found 3 bad caps on the power board, C811, C812 and C814.

LG TV, 42LG50
Reason for Service: Picture was solarized.
Solution: Found and replaced bad U21 on the T-Con Bd. AS15F.

LG TV, 60PV400UB
Reason for Service: Power comes on, but set doesn’t prime.
Solution: Repaired Z-Sus module by replacing a leaky C418 chip cap and three 10ohm resistors R430, R439 and R517.

LG TV, 60PV400
Reason for Service: Set powers on, but no prime.
Solution: Replaced following on Z-Sus module: R439, R517 R430, all 10ohm chip and C418.

RCA LED52B45RQ
Reason for Service: Dead, but red LED blinks once when power button pressed.
Solution: Found bad cap on power supply board, C14, 47uF.

Samsung TV, PN60E530A3FXZA
Reason for Service: Doesn’t prime, no video or picture.
Solution: Replaced ceramic caps with 10uF/63V electrolytics. C5160, C5162 and C5046. 

Sanyo TV, FW65D25T
Reason for Service: No video, audio is okay.
Solution: Replacing FRC board fixed set. 

Vizio TV, XVT3D474SV
Reason for Service: Set will not start. Amber logo, but doesn’t change to white.
Solution: Reflowing the BGA on main board fixed the set. U9

Want more tips? Click here to see all electronics and appliance tips!


Bosch Oven Troubleshooting and Repair Tips

**NOTICE**
Due the danger and complexity of electronic equipment repair, the following technical tip is intended for professional reference only. Please refer to manufacturer’s recommendations as Encompass does not guarantee the accuracy, reliability or safety of this information. 


This article provides step-by-step instructions for fixing some of the most common Bosch oven problems. From replacing a burned-out light bulb to cleaning a dirty door seal, these tips can help keep an oven in top condition:

1. Oven won’t turn on

One potential reason that an oven is not turning on is interruption to the power supply. Check to see if the circuit breaker has tripped or a fuse blown. If so, reset the breaker or replace the fuse and try turning on the oven again.

Another common cause for an oven not turning on is a faulty igniter. If the igniter — which lights the gas in the oven — is not working correctly, the oven will not heat up. To test the igniter, see if it is glowing. If it’s not glowing brightly or not lighting the gas within 90 seconds, it needs to be replaced. You can also test the igniter for continuity with a multimeter.

Finally, a damaged bake element can also prevent an oven from turning on. The bake element, which generates heat, is located at the bottom of the oven. If it’s cracked or broken, it will need to be replaced to fix the problem.

2. Oven light out

There are a few different causes for an oven light to go out. First, check the light bulb to see if it needs to be replaced. If the bulb is intact and screwed in tightly, the problem may be with the socket or wiring. When sockets and wiring are involved, it’s best for safety to to call a professional electrician to assist.

Otherwise, it may be a blown fuse. Check the fuse box to see if a fuse has blown, and replace it if necessary.

3. Oven time not setting

One of the most common problems with ovens is a clock or timer not working. One reason for this could be that the power cord is not plugged in all the way. Additionally, the power outlet may not be working, or there’s something else wrong with the oven.

First, ensure the power cord is plugged in securely. If it is, check the power outlet by plugging in another appliance. If the outlet works, then there may be a separate problem with the oven, requiring a professional service provider.

4. Oven not heating

Another common problem is an oven not heating. This can be caused by a variety of issues, including a faulty heating element, blown fuse or issue with the temperature. In most cases, the problem can be resolved relatively easily.

Check to see if the heating element is still in place and functioning properly. Next, check the fuse box and replace any blown fuses. Finally, adjust the temperature to see if that resolves the issue.

If the oven still isn’t heating up, it’s possible there’s a more serious problem with the wiring. In this case, it’s best to call in a qualified technician for further assistance.

5. Oven not baking evenly

There are several reasons why an oven might not bake evenly. One common cause is a build-up of dirt and grease on the heating elements. This gunk can insulate the elements and prevent them from adequately conducting heat.

Another possibility is that the oven door is not sealing properly. If there is even a small gap, heat can escape, resulting in uneven baking. The final and most serious cause is a problem with the oven’s thermostat. This can cause the temperature to fluctuate, making it impossible to achieve consistent results.

Fortunately, there are a few simple steps that can be taken to fix these problems. First, make sure to clean the oven regularly, paying special attention to the heating elements. If the door is not closing properly, check the gasket for damage and replace if necessary. Then, if the thermostat appears to be malfunctioning, contact a qualified technician for repairs.

6. Broiler not working

One obvious reason is the broiler element is not heating up. If so, replace it. Another possibility is a problem with the igniter, which sparks gas in the oven. If it’s not working, the gas won’t ignite and the broiler won’t turn on. It will need to be replaced if found to be faulty.

Finally, the gas valve could be defective. If the gas valve is not open, gas will not flow to the oven and the broiler will not turn on. If you think this might be the problem, it’s best to contact a qualified technician to replace the valve.


Special thanks to Fred’s Appliance Academy for this helpful tip!

Best Ways to Clean Dryer Vents

**NOTICE**
Due the danger and complexity of electronic equipment repair, the following technical tip is intended for professional reference only. Please refer to manufacturer’s recommendations as Encompass does not guarantee the accuracy, reliability or safety of this information. 

Vents are generally installed from a dryer to an external port on the side of the home. They’re an important part of any laundry setup, but are often ignored until they become clogged and cause issues such as:

  • Excessive lint on clothing
  • Minimal to no drying
  • Laundry is excessively hot
  • Humidity might rise during dry seasons

Cleaning a clogged vent is relatively easy; here are five steps to getting your unit in tip top shape:

1. Disconnect Dryer to Access Vent

First, ensure the dryer is disconnected from its power source. Look for any clips or screws that might hold down the housing from the unit and unclip/unscrew them to detach the vent from. Always make sure the power has been disconnected before attempting any appliance repair to avoid getting shocked.

2. Clean Exhaust 

Excessive lint most often builds within the exhaust that connects the dryer housing. Take a quick look at the filters and the overall unit for any dirt/sand or lint. Use a  wire brush to reach in with a twisting motion and then gently pull it out to capture lint and other possible debris.

3. Brush and Vacuum Duct and Pipe

This step requires the most effort due to its location going from the dryer unit inside the wall through to the outside. Place a bucket or small trash can underneath the end of the duct to catch debris. Then, use a stretchable or twisty brush and scrub the inside of the duct. Use a brush handle extension to reach into the pipe as far as possible. The pipe leads the duct all the way to the exterior for expelling air and lint, so it needs cleaning.

After scrubbing the duct and pipe interior walls, lint should come loose. Use a vacuum rod extension or flexible hose and run it down the length of the duct to suck up the debris.

4. Check Exterior Vent

All vents lead to an outer exhaust opening. To help ensure the brushing has not propelled the lint to the far end, check the exterior opening as well. Open the grate of the vent if it is grilled. Use a flexible brush to scrub as far as you can reach, and then use a vacuum to remove loosened lint. This will ensure that airflow is unobstructed and directed toward wet clothes instead.

5. Reconnect Everything 

To return the dryer to working condition, connect the duct and pipe to the exhaust section of the dryer unit, taking care to replace the outer grill. Next, reconnect the exhaust to the dryer and test it to check for proper airflow. If everything flows nicely without spitting out too much debris, it’s a home run.


Special thanks to Fred’s Appliance Academy for this helpful tip.

CE Tech Tips — September 2022

**NOTICE**
Due to the danger and complexity of electronic equipment repair, the following technical tip is intended for professional reference only. Please refer to manufacturer’s recommendations as Encompass does not guarantee the accuracy, reliability or safety of this information.

Insignia TV, NS-LCD47HD-09
Reason for Service:
No video, B/Ls okay.
Solution: Replacing U507 on main board fixed the set (was running very hot).

LG TV, 42LG50
Reason for Service: Picture solarized.
Solution: Found and replaced bad U21 on T-Con Bd. AS15F.

LG TV, 50PJ350-UB
Reason for Service:
Set starts for a second then shuts off.
Solution: Check/replace R927 & R929, both 22Ω/5W.

Protron TV, PLTV-32CM
Reason for Service
: Audio volume low and distorted.
Solution: Replacing two bad caps on main fixed set. CE6 and CE7, 100uF/16V.

RCA TV, RLDED5078A-D
Reason for Service: No video or OSD.
Solution: Replaced open fuse on T-Con, 3A.

Samsung LN-T2342H
Reason for Service: Dead set.
Solution: Found bad zener in power supply, DZB803.

Sylvania TV, 6432TFY
Reason for Service: Dead set, may chirp.
Solution: Found bad D653; replaced, 18V zener.

Vizio TV, E420VA
Reason for Service: Dead set.
Solution: Replaced small blue cap in power supply, C911, .01uF/1KV and F901, 5A fuse.

Vizio, VW42L
Reason for Service: Backlights strobing and making buzzing noise.
Solution: Replaced C421 in power supply and two 470mF/35V on master and slave inverter boards.


Want more tips? Click here to see all electronics and appliance tips!


Remove Excess Suds from Dishwasher

**NOTICE**
Due the danger and complexity of electronic equipment repair, the following technical tip is intended for professional reference only. Please refer to manufacturer’s recommendations as Encompass does not guarantee the accuracy, reliability or safety of this information. 

Ever experience suds in a dishwasher blowing bubbles out the bottom and flooding the kitchen? Here’s what to do if it ever happens again:

Excess suds are typically caused by introducing soap that is not intended for dishwashers. The most common soap that should not go in a dishwasher is standard liquid soap used for handwashing dishes. This type of soap is meant to create lots of suds, while dishwashing detergent is not.

So how do you get rid of the suds flowing out of the dishwasher and save your kitchen floor? It’s as easy as introducing a little bit of vegetable oil. Stop or pause the dishwasher’s current cycle and pour about one-quarter cup to one-half cup into the bottom of the unit. Close the door and let it continue to run again for just a few more minutes. Then, open the door again and select the “cancel drain” cycle. After the unit has drained completely, open the door again and rerun the normal wash cycle.

Allow the unit to run for about five minutes or so. And then again, open the door, select the cancel drain button and let the unit drain out. Afterward, open the door and inspect the bottom for suds. If suds still exist, go ahead and start a normal wash cycle. And just repeat that process until the suds are gone. If there are no more suds, then it’s back to normal.

Special thanks to Fred’s Appliance Academy for this helpful tip.

Properly Test Thermistor

**NOTICE**
Due the danger and complexity of electronic equipment repair, the following technical tip is intended for professional reference only. Please refer to manufacturer’s recommendations as Encompass does not guarantee the accuracy, reliability or safety of this information. 

One of the most accurate ways to test a refrigerator’s thermistors is to use a glass of ice water.  Here is a helpful video showing the process.

With a thermistor hooked up to a multimeter, submerge into a glass of ice water. In the video, the multimeter read about 11,000 ohms prior to inserting the thermistor into the water. This is a correct reading as the current temperature of the room in the demonstration is 73°F.

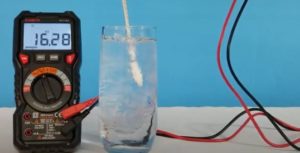
When testing a thermistor, it’s important to consult a chart that states what the resistance value of the thermistor should be at any given temperature. This particular thermistor should have a resistance value of about 32,000 ohms at 32°F, which makes a glass of ice water a perfect testing mechanism.

The video shows resistance value climbing towards 32,000 ohms. As the resistance value reaches 32,000 ohms, its reading starts to slow as the thermistor reaches 32°F. It read correctly at 73°F as well as 32°F. Now, keep in mind, that these resistance values should be within plus or minus 10%. Out of range by more than 10%, plus or minus, it should be replaced.

Special thanks to Fred’s Appliance Academy for this helpful tip.

CE Tech Tips — June 2022

**NOTICE**
Due to the danger and complexity of electronic equipment repair, the following technical tip is intended for professional reference only. Please refer to manufacturer’s recommendations as Encompass does not guarantee the accuracy, reliability or safety of this information.

Hitachi TV, 57F59A
Reason for Service: No video or weak video. No voltage on ABL pin of the fly.
Solution: Replaced open RH28.


LG TV, 55GA6400
Reason for Service: Set has no audio.
Solution: Reflowing BGA on main board fixed set. IC100.

LG TV, 47LW5600
Reason for Service: Picture has horizontal lines across whole screen.
Solution: Reflowing BGA on main fixed set. IC101.

LG TV, 50PA4500
Reason for Service: Power button or remote will not turn set on.
Solution: Found bad cap in power supply, C802; replacing fixed set. .022mF/1600V

Mitsubishi TV, WDY57
Reason for Service: Set shuts off.
Solution: Cleaned filters and replaced sensor behind lamp.

Samsung TV, LN32B360C5d
Reason for Service: Set turns on one time at plug in, then won’t turn on again unless it’s unplugged first.
Solution: Repairing bad tab on power supply board used for CCFL tubes fixed set.

Sony TV, KDL-40V4100
Reason for Service: No video.
Solution: No 12V to T-Con; replaced U21, (AS15F) on T-Con and replaced F1422/1421 on BU Board.

Vizio TV, M552i-B2
Reason for Service: Dead set, power light doesn’t appear at power on.
Solution: IC901, ZD909, 4.7Vzener, D950B.

Vizio TV, E420VA
Reason for Service: Dead set.
Solution: Replaced small blue cap in power supply, C911, .01uF/1KV and F901, 5A fuse.

Want more tips? Click here to see all electronics and appliance tips!


Replace Oven Light Cover

**NOTICE**
Due the danger and complexity of electronic equipment repair, the following technical tip is intended for professional reference only. Please refer to manufacturer’s recommendations as Encompass does not guarantee the accuracy, reliability or safety of this information. 

Having trouble getting that pesky glass cover off to replace your oven light? Here are a few helpful tips.

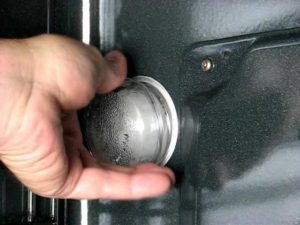
So the first and obvious way, and you’ve likely already tried, is just to use your hands. Lefty Lucy, Righty Tighty. Simply turn the cover to the left, pop it off, swap the bulb, put the cover back on, turning it to the right to tighten back into place.

If the cover won’t come off easily, wrap a rag around the cover, and give it a GENTLE tap with a hammer.  If you hit it too hard, the glass will break. After gently hitting the cover, turn it to the left, swap the bulb, replace the cover and turn it to the right to lock it down.

Lastly, if all else fails, you can use a strap wrench, which can be found at an auto parts store. This is basically an oil can wrench, but it serves a lot of purposes. Slip it over the cover, tighten it down, and give it a turn to the left. If that breaks it free, you’re done! If not, time to call a pro.

Special thanks to Fred’s Appliance Academy for this helpful tip.

Whirlpool Dishwasher Pump Replacement

**NOTICE**
Due the danger and complexity of electronic equipment repair, the following technical tip is intended for professional reference only. Please refer to manufacturer’s recommendations as Encompass does not guarantee the accuracy, reliability or safety of this information. 

When a dishwasher won’t clean dishes, one of the first likely causes is the pump outlet. This part connects the main water supply tube to the pump and spray arms. If it cracks, water pressure decreases and will not properly shoot out of the spray arms to effectively wash food 
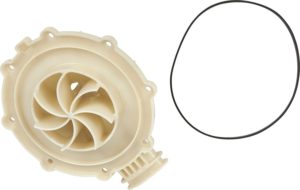
particles away. Here’s how to fix a Whirlpool dishwasher in just a few minutes with replacement part 8194582.

1. Unplug appliance. Even though this repair doesn’t involve electrical components, unplugging or flipping the circuit
breaker to major appliances (especially major appliances with water) better ensures your safety.
2. Access spray arms. Open the dishwasher door and remove lower rack. Unscrew spray arm central piece and fully remove, along with arms and bearings. One metal bearing is in the spray arm apparatus, and the other is below resting on the pump outlet.
3. Remove pump outlet. There are eight screws holding the pump outlet in place below the spray arm apparatus. Use a
screwdriver to remove the screws. Set them aside for later use since the replacement parts do not come with replacement screws. Disconnect from supply tube. Remove the old pump seal with flathead screwdriver.
4. Install replacement part. Put seal in housing and connect pump outlet to water supply tube. Make sure outlet is aligned with holes and screw into position.
5. Put the dishwasher back together. Reinstall bearings and spray arm apparatus. Make sure it spins with friction or tension.

Special thanks to Fred’s Appliance Academy for this helpful tip.

Parts Town Acquires Encompass Supply Chain Solutions, Inc.

Acquisition broadens Parts Town’s offerings of OEM parts for products and appliances throughout the home

Addison, IL – April 5, 2022 – Parts Town, a global market leader in genuine OEM parts distribution and technology, has acquired Encompass Supply Chain Solutions, Inc. (“Encompass”), a leading national distributor of OEM repair parts for the home.

Headquartered near Atlanta, Encompass has grown rapidly in recent years by building strong manufacturer relationships, innovating through supply chain management and e-commerce, and providing excellent customer service. The company maintains six facilities, has close to 250 team members, more than 200 manufacturer relationships, and delivers nearly $200 million in annual revenue. Robert Coolidge, current president, and CEO of Encompass will continue to lead the business with additional investment and support from Parts Town.

“We are excited to partner with Robert and the entire Encompass team. The business has grown impressively under Robert’s leadership, and we are eager to support this great team in any way possible,” states David Wenger, Group President at PT Holdings, Parts Town’s parent company. Wenger continues, “We first entered the residential parts market with our acquisition of Dayton Appliance Parts in early 2021 and have been thrilled with the growth opportunities and manufacturer partnerships that have emerged.

We are eager to take another step forward with Encompass to grow in several product categories, including residential appliance parts and consumer electronics. Our efforts will continue to focus on improving the customer experience and growing genuine OEM parts sales in support of leading manufacturers.”

Following the transaction, Encompass and Dayton Appliance will remain separate entities within PT Holdings with that division focusing on residential parts under the leadership of Robert Coolidge as the Divisional President, who has been with Encompass for 30 years. Coolidge states, “This is an extraordinary opportunity to join a great group of companies. Parts Town is the most innovative, fastest growing parts distributor of any kind and we are eager to gain even more knowledge to better support our customers and manufacturers. The Parts Town team has demonstrated high integrity and has made us

feel very welcomed. We are ready for this next chapter of growth and innovation at Encompass.” To learn more about Parts Town and its offerings, please visit partstown.com.

About Parts Town

 Parts Town is the leading, technology-enabled global distributor of genuine OEM (original equipment manufacturer) parts for the foodservice industry. Driven by its commitment to technology and innovation, Parts Town is expanding to serve new segments including HVAC and residential appliance parts. When there’s a hiccup for any foodservice provider or service technician company, Parts Town is ready to jump

in and help with the most in-stock parts on the planet, innovative technology, and an unmatched customer experience. Its customized solutions benefit foodservice operators, service companies and a growing list of other customer segments. Partnering with more than 1,100 leading manufacturers, Parts Town improves the supply chain, increases sales of genuine OEM parts, and keeps every customer’s business running like clockwork.

Parts Town’s drive for innovation is led by Red Lightning Group, a new and separate division of PT Holdings focusing solely on innovation to support the foodservice industry and beyond, accelerating the pace of breakthroughs that support the group’s diverse customer base. Red Lightning Group’s mission is to boldly strike at lightning speed to deliver game-changing innovation and technology in an effort to discover the next big thing.

For more information, visit partstown.com/.

Media Contact
Linda Ramsey
lramsey@partstown.com
800.438.8898