Tech Tips

CE Tech Tips — February 2018

**NOTICE**

Due the danger and complexity of electronics repair, the following shared technical tips are intended for professional reference only. Please refer to manufacturer’s recommendations as Encompass does not guarantee the accuracy, reliability or safety of this information.

Audiovox TV,  FPE3206
Reason for Service: No audio
Solution: Found SM cap C210 bad, and had leaked on board.  Clean board thoroughly in the surrounding area. 

Hitachi TV,  50V500A
Reason for Service:  No video with sync bars, or aspect not working.
Solution:  These symptoms are caused by problems with the PSC3 (50 pin) connector, on either end, or with the ribbon cable #EK01182. 

Magnavox TV, 26MF330B/F7
Reason for Service:  Dead
Solution: Found shorted cap, C645 in power supply.  3300uF/6.3V 

Mitsubishi TV, VS-583R
Reason for Service:  Convergence not working
Solution: Replaced the following to fix set:  STK392-110’s, R520 & R522,  0.82ohm/2W,  & D520 & 522

 Sharp TV,  LC-60E69U
Reason for Service:  Dead
Solution: Found 3 open resistors in power supply.  One meg each.  Replacing, fixed the set.

Sony TV,  KLV26HG2
Reason for Service:  Won’t power up, no lights on front panel.
Solution: Replacing the B board fixed the set.

Toshiba TV,  MW26G71
Reason for Service:  Shutdown
Solution: Flyback, FB401 found to be defective.  Replaced with AE004955.

Vizio TV,  VX20LHDTV
Reason for Service:  Won’t start
Solution: When turning set on, logo was amber but never turned to white.  Replacing U8 fixed the set.  AMC1117 regulator.


Replacing GE Refrigerator Temperature Control

**NOTICE**
Due the danger and complexity of electronic equipment repair, the following technical tip is intended for professional reference only. Please refer to manufacturer’s recommendations as Encompass does not guarantee the accuracy, reliability or safety of this information. 

Not cooling is a common complaint with refrigeration, and unfortunately, the cause of the issue can vary greatly. Once you’ve isolated the cause to the temperature control, order replacement part (# WR09X20002 for most GE/Hotpoint models) and follow these steps:

1. Unplug the refrigerator.

2. Pull out the temperature control box. Open the fresh food door and find the temperature control panel. Unscrew the light bulb, then loosen the screws so you can lower the box cover. Next, unplug the wire harness connecting the box cover to the remainder of the temperature control and take the box cover out of the refrigerator. The part you will be replacing is in this box.

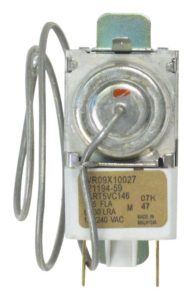
3. Isolate the temperature control. First, remove the knob from the shaft in the back right corner with a screwdriver. Then, pry the tabs connecting the grounding and adjacent wires free.

4. Remove the control. Pull back the tabs on each side of the temperature control. Do it one side at a time so you can tilt the corners of the control to pull it free. As you’re lifting the control, also pull free the capillary tube that is attached to the control.

5. Switch the plastic around the capillary tubing. The new part comes with a capillary tube but needs the outer plastic tube. Reshape the capillary tubing to mirror the older part. Then pull the plastic tube off the old capillary and slide it into place on the new part.

6. Replace the temperature control. First, align the tubing and push it into the groove, including around the timer. Then plug the control into the terminals. Once the control is in place, make sure the tubing is still in place.

7. Replace the surrounding parts. Reattach the wires exactly as you disconnected them. Then put the knob back into place by ensuring the wide and narrow ends fit.

8. Put the box back into place. Reattach the wire harness. Then make sure the actual cover box goes around the insulation and front shield. Then re-tighten the screws and screw the light bulb back in the socket.

Special thanks to Fred’s Appliance Academy for this helpful tip!

Dryer Sheets May Be No Friend to Your Laundry

While you may enjoy the fresh clean scent that dryer sheets provide clothes, you may want to think twice about using them. According to Mark Kesner, senior trainer with Level 2 Learning, most dryer sheets contain some type of petroleum product that leaves a residue behind on clothes and the dryer. This in turn also reduces the flame retardancy of the material being dried with these sheets.

Dryer sheets are known to have a thin layer of lubricant, which is electronically conductive, resulting in softer feeling clothes and reduced static electricity. The chemicals that make up dryer sheet fabric softeners target electrostatic charges and eliminate those that linger on the top of fabrics to eliminate shock. Fabric softener dryer sheets won’t permanently damage a dryer, but they could affect operating efficiency, which impacts utility bills.

Here are 10 alternatives to dryer sheets you may want to try:

  1. Line Dry: Dry your clothes naturally on indoor or outdoor drying racks.
  2. Remove While Slightly Damp: Dry clothes at a lower temperature and remove them from the dryer before they’re completely dry. This remaining moisture helps prevent static cling.
  3. Shake, Shake, Shake: Once out of the dryer, giving your clothes a good shake helps remove any remaining static.
  4. Separate the Synthetics: Launder natural and synthetic fabrics separately, as synthetics (nylon, rayon, etc.) are responsible for most of the static. A dryer full of natural fiber garments is less likely to come out all staticky—particularly if not overdried. Synthetics often air dry quickly.
  5. Aluminum Foil: Several sources report that placing a wad of aluminum foil in the dryer with your clothes helps eliminate static.
  6. Baking Soda: Baking soda works as a fabric softener by softening the water (changing its pH). Try adding one-quarter to one-half cup baking soda to your wash cycle.
  7. White Vinegar: Vinegar can also work as a fabric softener, especially if you have mineral rich “hard” water. Try adding one-half cup to the wash or rinse cycle. In the rinse cycle, vinegar will additionally reduce static cling.
  8. Vinegar and Essential Oils Spray: Fill a spray bottle with one cup of white vinegar and 1.5 teaspoons essential oil, such as eucalyptus. Shake well and then apply 10 to 15 squirts to your wet clothes before starting the dryer. The vinegar smell will be gone when the clothes are dry. Eucalyptus oil, geranium, citrus, lavender, mint, and pine are other options.
  9. Homemade Dryer Sheets: It’s not difficult to make your own eco-friendly, cost-effective dryer sheets out of old dish towels, bed linens, t-shirts or other cotton fabrics. Visit View From the Fridge or Wellness Mama for instructions. There are also reusable, eco-friendly, static-eliminating dryer sheets on the market today.
  10. Dryer Balls: Dryer balls made from natural fibers (typically wool) are a super cool option. They wick out moisture and create air space between your clothes as they tumble around, reducing drying time and lowering the electrical charge that accumulates when fabrics rub against each other, thereby reducing static cling. Just like with homemade dryer sheets, you can dab them with a few small drops of essential oil. Let the oil fully soak into the dryer balls for ten to 20 minutes before using them.


CE Tech Tips — January 2018

**NOTICE**

Due the danger and complexity of electronics repair, the following shared technical tips are intended for professional reference only. Please refer to manufacturer’s recommendations as Encompass does not guarantee the accuracy, reliability or safety of this information.

Hitachi TV, 50V500A
Reason for Service:  Picture turns different colors, all bright or too bright, dark picture, no brightness, intermittently or permanently.
Solution: Replace the drive PWB assembly, #JP07191, sub, JP07192

Mitsubishi TV, WD-73C8
Reason for Service: Shutdown with error.
Solution: Self-diagnosis error may be 3-4 or 6-6, the lamp may light for 30 seconds and go out or may not light at all.  Check for continuity on all pins on the wiring harness between connector FB from the main board to connectors CJ3 on the ballast. The replacement wiring harness comes in two sections, connector FB to FB interconnect part # 249B917030 and connector FB interconnect to CJ3, part #249B917040.

Samsung TV, LN40A550
Reason for Service: Powers up intermittently.
Solution: Replaced the usual bad caps in the power supply with a kit from Amazon, still no fix.  Heating and cooling determined IC503 probably bad.  Found one in a scrap set, and it fixed this set.

Sharp TV, LC-46D85UN
Reason for Service:  Dead set, no standby.
Fix:  Replaced IC7905, TNY268PN and R7914.  2.2 ohm/half W, fusible.

Sharp TV, LC37D43U
Reason for Service:  Dead.
Solution: Found D7907 shorted.  IN5383B

Sony TV, KDL32L504
Reason for Service:  Dead.
Solution:  Replaced IC6102.  Sony #6-708-801-01

Sony TV, KDF70XBR950
Reason for Service:  Set plays for about a half hour, then shuts down with a 7 blink code.
Solution:  Replacing the A board fixed this set.  A-1302-366-A.

Toshiba TV, 57H84
Reason for Service:  Picture has jagged vertical lines in the picture.
Solution: Repaired the hyper module by replacing SMs.  C822 & 823, 47uF/16V,  CH003, 10uF/16V, CS24, 22uF/16V, CS25 & 26, 10uF/16V.

Whirlpool Electric Dryer Water Inlet Valve Replacement

**NOTICE**
Due the danger and complexity of electronic equipment repair, the following technical tip is intended for professional reference only. Please refer to manufacturer’s recommendations as Encompass does not guarantee the accuracy, reliability or safety of this information. 

Whirlpool electric dryers are equipped with steam function for better drying, but if the steam function suddenly stops working, the water inlet valve may be the cause. To repair, order the replacement valve part (#W10815373) and follow these steps to access and replace the part with just a few hand tools and half an hour’s time:

1. Unplug dryer and turn off cold water supply. You should always shut off  power to appliances during inspections and repairs, especially if they involve water.
2. Remove water supply line and external venting from back of machine to access rear components. There may be some water already in the supply line, so be sure to have a bowl and cloth on hand to remove water.
3. Remove top part of rear panel and slide top panel off completely. Remove rear panel, which will provide full access to dryer’s internal parts.
4. Disconnect water inlet valve wires and unscrew mounting bracket. Valve will be at bottom of machine and is a blue piece connected
to wires and its own mounting bracket. If you’re unfamiliar with dryer wiring, take picture of wires’ colors and orientation before disconnecting  to assist as a guide during reassembly.
5. Once mounting bracket is free, unlock supply line from water inlet valve by turning and depressing locking mechanism around supply tube.
6. Replace valve. Add new valve by adding water supply tube and putting locking mechanism back into place. Reattach new part’s
mounting bracket with old screws and reconnect wires to terminals.
7. Reattach rear and then top panels, and then attach vent and water supply lines.

Steam function should work again now that machine can correctly introduce water to the system. Dryers can be tricky to repair, especially since there are a few steps to take before getting to the inner workings.

Special thanks to Fred’s Appliance Academy for this helpful tip!

CE Tech Tips —

CE Professional Tech Tip Sharing
December 2017

**NOTICE**

Due the danger and complexity of electronics repair, the following shared technical tips are intended for professional reference only. Please refer to manufacturer’s recommendations as Encompass does not guarantee the accuracy, reliability or safety of this information.

Mitsubishi TV, WD-73C8
Reason for Service: Shutdown with error
Solution: Self-diagnosis error may be 3-4 or 6-6; the lamp may light for 30 seconds and go out or may not light at all.  Check for continuity on all pins on the wiring harness between connector FB from the main board to connectors CJ3 on the ballast. The replacement wiring harness comes in two sections, connector FB to FB interconnect part # 249B917030 and connector FB interconnect to CJ3, part #249B917040.

Panasonic TV, TCP42ST30
Reason for Service: Seven blink error code
Solution:  Check for shorted surface mount FETs on the ysus board.  GT30F131

Polaroid TV, TLX03210B
Reason for Service:  Set tries to start, then red LED blinks continually
Solution: Found two bad 10uF/450V in the power supply.  Replacing fixed the set.

Sanyo TV, DP46819
Reason for Service:  Turns on for a few seconds, then turns back off.
Solution:  Replacing IC5750 fixed the set.

Sony TV, KDL46EX620
Reason for Service: Set cycling on and off.  Has an 8 blink code.
Solution: Reset the TV with the remote; you may have to repeat this procedure several times:

  1. Unplug TV for at least 30 seconds.
  2. Plug set back in, and if set comes On, turns Off and back On, OR if set does not come On, turn set On, Off and back On.
  3. Quickly Press and hold the arrow up button.
  4. Press and release the power button on the TV.
  5. Release the arrow up button and see if set resets. (goes off, comes back on, shows channel 2, then asks language setup.)
  6. If TV does not come back on, or if channel 2 is not displayed, either power set back On if Off, and try reset again, OR try reset if set is On.

Vizio TV,  L42HDTV10A
Reason for Service: Set turns on for a few seconds with no signal message, then shuts down
Solution: Set may have been switched to VGA mode with no computer attached, which would shut the set down.  Connect a computer to see if set stays on, then switch back to one of the Input settings that has a signal.


CE Tech Tips — November 2017

**NOTICE**

Due the danger and complexity of electronics repair, the following shared technical tips are intended for professional reference only. Please refer to manufacturer’s recommendations as Encompass does not guarantee the accuracy, reliability or safety of this information.

Hitachi TV, 60SDX88B
Reason for Service: Shuts down.
Solution:  Q777, Q657 and EP98

Magnavox TV, 37MF321D
Reason for Service:  Dead, light flashing.
Solution:  Found two swollen caps in power supply, replacing them restored normal operation.  2081,  1500uF/35V and 2074, 2200uF/25V.

Panasonic TV, PT50LC13
Reason for Service:  Need to reset lamp timer after changing the lamp.
Solution: Turn on TV, and simultaneously press and hold volume down on front of set and the PIP/VTR on the remote.  Hold for 10 seconds, then OSD will say Lamp Time Reset to 0.

Polaroid TV, TLX03210B
Reason for Service:  Set tries to start, then red LED blinks continually.
Solution: Found two bad 10uF/450V in the power supply.  Replacing fixed the set.

Sony TV, NSX-46GT1
Reason for Service:  The set turns on with the Sony picture, then freezes.  Goes no further.
Solution:  Replaced the M board and upgraded the software.  Part # A-1787-298-A

Toshiba TV,  52HM84
Reason for Service:  The lamp won’t light.
Solution:  Check ballast components:  1k resistors, two rectifiers and C6,  0.1uF/400V metal film poly cap. Ballast needs 350V and a 5V enable signal to work.

Vizio LCD TV E550VL
Reason for Service:  Shuts off intermittently.
Solution: Replacing the main board fixed the set.

Zenith TV, 9-1302 module
Reason for Service: No video and intermittent raster.
Solution:  Look for bad solder on fly pins; also check for bad solder on top and bottom pins of daughter board.


Is your business listed accurately online? Here’s why it’s so important.

In today’s virtual world, search engines have replaced the Yellow Pages as the #1 tool consumers use to find anything they need, from driveway paving to washer repair. Developing a dynamic business website is important, but ensuring your company is accurately listed on various other online channels is just as critical. These online directories or “citations” are any sites that post a company’s name, physical address, phone number and web address.

Some examples of citation sites are Google My Business, Yelp, Facebook, Foursquare, Merchant Circle, CitySearch and Bing Places, among others. Like the phone books of days past, businesses must ensure their listings are correct with updated information. Companies often set up their profiles and never look at them again. However, the Internet is a dynamic entity — it moves and changes like the wind.

A simple mistake can occur like it did recently with Fred’s Appliance Service.  A DSL (Internet connection) number ended up being listed by accident to multiple online directories. The DSL number would ring forever with no answer. An unintended error by the DSL provider caused major issues for Fred’s Service. Customers would call for hours with no luck assuming the company was closed, and they took their business elsewhere. Unlike today’s high-tech appliances, there is no error code for this type of blunder. The damage is hard to calculate since Fred’s had no idea how long the issue had been going on and how many people tried to call the wrong number.

Sometimes errors may be more intentional. Take this recent news story of a customer calling the number on a Google listing only to have someone pose as a company representative. It wasn’t until the customer found a different number listed on a different website that she discovered the issue. The company owner had not been checking his company listings, enabling others to siphon customers away while damaging his reputation in the process.

Ensuring your customers have the right information is important, but it’s also important to look through search engines like Google and Bing. Just because you have a Google My Business listing does not mean you will show up in Google search results when someone enters “appliance repair near me.” Search engines pull from all citation sites to narrow down the best results to search queries. So having your business listed on as many citation sites as possible will help increase your online exposure.

To check your business’ online profile, start by taking time to review listings at Google My Business, Bing Places, Facebook and Yelp. Make sure the correct data is provided, including your hours of operation (including holiday hours). It can be overwhelming and time consuming to maintain all your listings, so consider partnering with a marketing company like Fluid Services, which can help update listings and provide regular reports of the most common directories.  This will give you peace-of-mind knowing that your customers are going to consistently find the most accurate contact information for your company.

Special thanks to Fred’s Appliance Academy for this helpful tip!

CE Tech Tips — October 2017

**NOTICE**

Due the danger and complexity of electronics repair, the following shared technical tips are intended for professional reference only. Please refer to manufacturer’s recommendations as Encompass does not guarantee the accuracy, reliability or safety of this information.

Hitachi TV, 60SDX88B
Reason for Service: Shutdown
Solution:  Q777, Q657 & EP98

Magnavox TV,  37MF321D
Reason for Service:  Dead, light flashing
Solution:  Found two swollen caps in power supply, replacing them restored normal operation.  2081,  1500uF/35V & 2074,  2200uF/25V.

 Panasonic TV, PT50LC13
Reason for Service:  Need to reset lamp timer after changing the lamp.
Solution: Turn on TV, simultaneously press and hold volume down on front of set and the PIP/VTR on the remote.  Hold for 10 seconds, then OSD will say Lamp Time Reset to 0.

 Polaroid TV,  TLX03210B
Reason for Service:  Set tries to start, then red LED blinks continually.
Solution: Found two bad 10uF/450V in the power supply.  Replacing fixed the set.

 Sony TV,  NSX-46GT1
Reason for Service:  Set turns on with the Sony picture, then freezes.  Goes no further.
Solution:  Replaced M board and upgraded software.  Part # A-1787-298-A

Toshiba TV,  52HM84
Reason for Service:  Lamp won’t light
Solution:  Check ballast components:  1k resistors, two rectifiers and C6,  0.1uF/400V metal film poly cap. Ballast needs 350V and a 5V enable signal to work. 

Vizio LCD TV E550VL
Reason for Service:  Shuts off intermittently.
Solution: Replacing the main board fixed the set. 

Zenith TV, 9-1302 module
Reason for Service: No video and intermittent raster
Solution:  Look for bad solder on fly pins; also check for bad solder on top and bottom pins of daughter board.


Replacing Door Switch on GE Refrigerator

**NOTICE**
Due the danger and complexity of electronic equipment repair, the following technical tip is intended for professional reference only. Please refer to manufacturer’s recommendations as Encompass does not guarantee the accuracy, reliability or safety of this information. 

Note: this tip applies to GE Refrigerator Model GTE21GSHSS

If the light is out in your GE refrigerator model GTE21GSHSS and a new bulb didn’t fix the problem, you are most likely dealing with a malfunctioning door switch.Replacing a fridge door switch is an uncomplicated repair, and should only take a few minutes. Here’s an easy-to-follow guide:

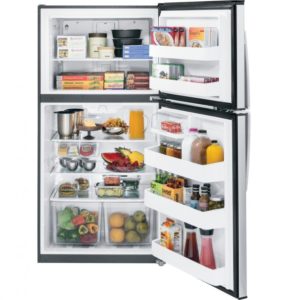
How to Replace Refrigerator Door Switch
Tools Needed:
â—Ź Putty knife
â—Ź Screwdriver
â—Ź New door switch wr23x20371

Safety First: Before starting any type of refrigerator repair , unplug the appliance. Wearing work gloves and safety goggles is also a must. Please read through the step-by-step guide provided before tackling this repair.

1. Open the refrigerator’s fresh food door and locate the door switch. Once you’ve found the switch, examine it to find out whether there is a screw holding it in place or not. If there is, use a screwdriver to remove it; if there isn’t, carefully pry the switch out of its housing with a putty knife. You may want to tape the edge of the knife to avoid damaging the inside of the appliance.

2. Gently pull the switch out to expose an inch or two of the wires. There will be either two wires, meaning the switch only controls your refrigerator’s light or four wires, which indicates the switch controls the light and the fan. Before you begin detaching the wires from the switch, label each one. This will make putting them back where they belong easier. To remove the wires, carefully pull them out by the connectors.

3. Connect the wires to the new door switch’s terminals. Once the wires are secure, either snap the switch back into its housing or reattach the screw you removed earlier.

4. Plug your refrigerator back in and test the door switch by opening and closing the fresh food door. If the light is still malfunctioning in your refrigerator or you have concerns about another appliance, please contact Fred’s Appliance today and we’ll be happy to help you.

Special thanks to Fred’s Appliance Academy for this helpful tip!