Tech Tips

CE Tech Tips — September 2017

**NOTICE**

Due the danger and complexity of electronics repair, the following shared technical tips are intended for professional reference only. Please refer to manufacturer’s recommendations as Encompass does not guarantee the accuracy, reliability or safety of this information.

Hitachi TV, 50V500A
Reason for Service:  All front LED indicators are flashing in sequence: Power, Temp, Lamp, Power, etc.
Solution: Replaced the lamp. 

Samsung Computer Monitor, 203B
Reason for Service:  No backlights.
Solution: Check all caps on power, inverter board.  It may have also blown a 3A fuse. 

Sony TV, KDL40EX400
Reason for Service:  Set turns on with chime, then shuts down with 6 blink code.
Solution:  Replaced the power supply module.  Part # 1-474-213-11

Sylvania TV, LC320SL1
Reason for Service:  Backlight flashes quickly, then the set shuts down.
Solution:  Replacing Q1970 fixed the set.  Used 2SC3200.

Toshiba TV, 40XV640U
Reason for Service: Has backlight, but no audio/video.
Solution: Replacing the main fixed the set.

Vizio TV, SV470M
Reason for Service:  Dead, no lights on.
Solution: Replacing the power board fixed the set.

Vizio TV, M3D421SR
Reason for Service:  Logo turns to white, but no picture, sound, OSD or control.
Solution: Updating the firmware did not fix the set.  Replaced Q19101 and Q19102, and R931, 0.1ohm, half W resistor.  All on the power board.

Vizio TV, E322VL
Reason for Service:  When you turn set on, the logo goes from amber to white, but keeps alternating amber, white then  set won’t start.
Solution:  Replacing main didn’t seem to fix the set.  This set has built-in Wi-Fi, and requires a couple of minutes to initialize the boot up. Set okay after that.

Oven​ ​Not​ ​Heating?​ ​How​ ​to​ ​Replace​ ​a​ ​Bake Element

**NOTICE**
Due the danger and complexity of electronic equipment repair, the following shared technical tips are intended for professional reference only. Please refer to manufacturer’s recommendations as Encompass does not guarantee the accuracy, reliability or safety of this information. 

If an electric oven is not baking at all, the issue can be diagnosed fairly quickly. If the oven has a sensor, shut the door completely to confirm the oven doesn’t work. If the door is working properly, then the issue may originate inside the unit.

Confirm that you need oven repair by actually seeing that the baking element is not heating. The back element itself can be checked once power has been disconnected from the oven and the element has been properly isolated. It should have roughly 10-50 ohms when checking for resistance. If the resistance is not within that range, the baking element on the bottom of the oven needs to be replaced. Replacing the bottom element is relatively simple; start by disconnecting power to the oven. Then, pull out the racks, remove the doors, and unplug the bake element.

Next, unplug the oven from the bottom. There should be two screws at the back of the oven holding the heating element in place. Remove the screws with a screwdriver, and plug the new element in at the same location of the old one. Make sure it fits properly.

Once the screws are on tightly, push the element into the oven cavity. At this point, all wires should be inside the wall and not visible. Things will get trickier if the bake element is hidden. More disassembly is required, and it’s recommended that you check the service manual for your specific product. Other components can prevent your electric oven from heating to the proper temperature such as the oven sensor probe,  main oven control board, and door alignment issues to name a few.

Special thanks to Fred’s Appliance Academy for this helpful tip!

CE Tech Tips — August 2017

**NOTICE**

Due the danger and complexity of electronics repair, the following shared technical tips are intended for professional reference only. Please refer to manufacturer’s recommendations as Encompass does not guarantee the accuracy, reliability or safety of this information.


Hitachi TV, 51UWX20B
Reason for Service: IC401 failure, protection
Solution: Check solder connection of C417.  Add C480, 0.1uF/50V across C417.  Add C481, 0.1uF/50V to pin 40 and 44 of IC401.

LG Plasma, 50PS30UB
Reason for Service:  Shuts down immediately
Solution:  Replaced Q801 & 802 in the power supply.  STW20NK50Z.  Also F801 was blown, 4A ceramic, slow-blow.

 Magnavox TV, 37MF331D/37
Reason for Service:  Menu pops up intermittently
Solution: Replaced two power switches to fix the set.

Samsung TV, LN3242HX/XAA
Reason for Service:  No backlight.  Might flash very briefly at turn-on.
Solution: Found an open secondary on one of the inverter transformers.  Replacing fixed the set.

Samsung TV, HLS7178WX/XAA
Reason for Service: Set shuts down intermittently when changing input or channel.
Solution: Replaced the DMD board.

Sharp TV, LC32D47U
Reason for Service:  Set comes on with a message to input the password, but end user does not know it.
Solution:  Enter the Factory Mode and Initialize the set to the out of box condition. Hold volume down and input on the set while plugging in.  You should see a K on the screen.  Release the first two buttons and hold down the front volume  and channel down.  Look for initialize on page 2.  When you see the green screen, unplug the set.

Sony TV, KDL-40XBR2
Reason for Service:  Set will power on, but no picture or sound
Solution: Found an open T-Con fuse, 3A SM.

Vizio TV, GV47LFHDTV10A
Reason for Service:  Has backlight but no video
Solution: Found U10 on the main board was defective.

Troubleshooting Whirlpool Ice Maker

**NOTICE**
Due the danger and complexity of electronic equipment repair, the following shared technical tips are intended for professional reference only. Please refer to manufacturer’s recommendations as Encompass does not guarantee the accuracy, reliability or safety of this information. 

If your ice machine suddenly goes silent with none of its usual rumblings, or you notice that the ice levels in your tray are decreasing, something in your ice machine isn’t working right. One of the most common problems is a broken connection point that stops ice from breaking free of the machine and landing in your tray, which signals the machine to keep making new ice.

How to Troubleshoot Your Whirlpool Ice Maker for Common Problems and Repairs:

  • Is the connection to the heating element broken? Ice machines work by pouring chilled water through the inlet valve into the machine, and the water starts to freeze in the pan. Depending on your ice machine model, it will either sense when the ice is frozen or operate on a timer. When the ice is considered complete by either mechanism, the floor of the ice machine will start to warm up through a heating element with just enough of the tines of your machine to push cubes free into the waiting tray. The two most common ways the heating element can start to break down and not function as well is if mechanisms within it freeze over or if water gets inside to the electrical components of the motor and heating element. Check over the heating element and any moving parts for bits of ice, which can be carefully chipped away to free those parts of the machine. You can also remove the ice machine from the freezer for a more thorough investigation, and some of the icy obstructions will just melt away. If it doesn’t look like unwanted ice is preventing the heating element from turning on, dismantle and inspect the heating element. Be sure to unplug the refrigerator prior to working on it.  If the metal is corroded and starting to break down, water is probably getting in through one of the connection points. If you see rust, carefully sand it away and solder on a copper contact point to ensure a new, strong connection.
  • Is the inlet valve hose frozen over?Look for a tub above your ice machine that pours water into the machine — it can often be found in the corner of the freezer. If the hose is full of frozen water, it will form an obstruction that prevents water from falling into the ice machine. Because it’s typically made of pliable material, squeeze the hose to break off or loosen any ice without detaching it from the valve.

If you think your Whirlpool ice machine might be experiencing different issues, try addressing the easiest solutions first that require the least amount of dismantling. This makes troubleshooting less of a potential headache, and also lets you determine trends in how your ice machine malfunctions if it frequently stops working. Once you can isolate the core problem, you can decide if a part needs to be replaced; if you would rather replace the whole machine; or if it’s simple enough to regularly maintain. When you have to dismantle the entire machine and inspect it outside of the freezer, make a list of any damage you see so you can systemically diagnose the problem. With ice machines, you often have to wait between each adjustment so the machine can try to complete a test cycle.

If your ice machine needs more than a soldered connection point to kickstart the heating element and it’s not just a frozen inlet hose blocking up your machine, be sure to contact Fred’s Appliance for more advice about how to fix your specific appliance.

Special thanks to Fred’s Appliance Academy for this valuable tip!


Replacing Spray Arms in Whirlpool Dishwasher

**NOTICE**
Due the danger and complexity of electronic equipment repair, the following shared technical tips are intended for professional reference only. Please refer to manufacturer’s recommendations as Encompass does not guarantee the accuracy, reliability or safety of this information. 

Your Whirlpool dishwasher is a time-saver. When it’s working properly, the time you spend in the kitchen is drastically reduced. However, nothing is more frustrating than opening your appliance to find the dishes inside are still dirty. While this may seem like a serious problem, it can actually be a simple fix. Damaged spray arms are a likely culprit. Luckily, replacing the lower or upper spray arm in your appliance is not a difficult or an expensive repair.

Safety First
Before starting any type of dishwasher repair, be sure to unplug your appliance. You should also turn off the water supply. Wearing a pair of work gloves and safety glasses to protect you from injury is highly recommended. If you don’t feel confident in your ability to safely carry out the repairs listed below, please contact a professional.  Also, keep in mind that dishwasher models vary and these steps may not match your dishwasher exactly.

The Spray Arm
Malfunctioning spray arms can affect your dishwasher’s ability to clean. Your appliance’s upper and lower spray arms discharge a strong stream of warm water and detergent, which helps sterilize your dishes. The holes in the spray arms can become blocked due to food particles or other types of debris, such as broken glass or hard water deposits. If a blockage is an issue, simply cleaning the small holes with a paper clip should solve your problem. However, the spray arms in your Whirlpool appliance can also become damaged over time. Cracks or separated seams can form, causing the spray arms to become ineffective. Luckily, replacing a spray arm is an easy fix. For help just follow the directions below.

  • Before you can remove the lower spray arm, pull out the bottom dish rack. Once the dish rack is out of the way, the spray arm will be visible. Next, pull up on the spray arm to detach it from the appliance. After discarding the old spray arm, carefully line up the new arm before pushing down to reattach the part. You should hear a snap when the spray arm is connected properly. Spin the arm around a few times to ensure it is secure and moves freely.
  • To gain access to the upper spray arm, remove the top dish rack. Then, separate the water supply tube from the mounting bracket, which is located on the top of the dishwasher’s tub. Once the tube is free, detach the spray arm assembly. Take the new upper spray arm and snap it into place on the water supply tube. Now reattach the water supply tube to the mounting bracket. Before you insert the dish rack, spin the spray arm to make sure it is stable and can move without any obstructions.

Special thanks to Fred’s Appliance Academy for this valuable tip!

CE Tech Tips — July 2017

CE Professional Tech Tip Sharing
July 2017

**NOTICE**

Due the danger and complexity of electronics repair, the following shared technical tips are intended for professional reference only. Please refer to manufacturer’s recommendations as Encompass does not guarantee the accuracy, reliability or safety of this information.

Emerson TV, LC321SS9
Reason for Service:  Set shuts down
Solution:  Replaced D637, FR154, used NTE580.

Hitachi TV, 57UWX20B
Reason for Service:  Convergence goes bad after customer does manual adjust and turns the set off
Solution:  Clear DCU Adj centering magnet for correct offset for RD, GRN and BLU according to the service manual.  Read old ROM, touch up and save.

LG TV,  42LG50-UA
Reason for Service: Dead set, red LED blinks continuous.
Solution:  Unplugging the inverter stopped the LED blinking.  Found a shorted C58 on the inverter board.  Replacing restored the set. 

Samsung TV, LN40A630M1
Reason for Service: Won’t start or very slow to start.
Solution:  Found bad DC to DC converter on the main board. IC101.  MP2363DN-LF.

Sharp TV, LC37HV4U
Reason for Service:  Set will not turn on unless it’s cool
Solution: Replacing IC4303 on main board fixed the set. 

Sony TV, KDL46HX820 (LED backlit)
Reason for Service: When turning set on, bottom part of screen is darker than the rest, then set shuts down with 4 blink error.
Solution:  Replacing backlight control board fixed the set.  LJ97-03357B.

Vizio TV,  E420VO
Reason for Service:  Shutdown
Solution: Replaced main board.

Zenith TV, Z56DC1D
Reason for Service:  After about 15 seconds, set shuts down, with lamp flashing
Solution: Replacing color wheel fixed the set.

Cleaning Refrigerator Condenser Coils

**NOTICE**
Due the danger and complexity of electronics repair, the following shared technical tips are intended for professional reference only.
Please refer to manufacturer’s recommendations as Encompass does not guarantee the accuracy, reliability or safety of this information. 

As the summer months approach and temperatures rise, customers may notice that their refrigerators will be running a lot longer than usual. Refrigerators may be warm, if not
hot to the touch. These symptoms may be caused by a dirty condenser or faulty condenser fan motor caused by a dirty condenser. We recommend checking the condition of the
condenser regardless of the customer complaint.

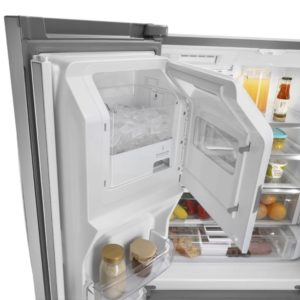
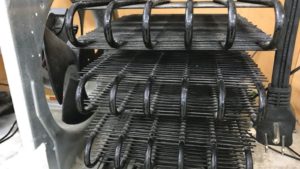
These types of issues don’t just happen in the summer months; in fact, they can happen at any time of the year especially when there are pets in the home. The condenser is part of the sealed system and is designed to expel heat from the refrigerator. We recommend that customers clean the condenser every 6 months. If you have pets, we recommend checking every other month since hair clings to the condenser.

To clean a condenser coil:
● Use a vacuum to clean. A brush also works but cannot remove all the dust; it will just move it around.
● If the buildup will not come off with a vacuum, use three towels to cover the front and sides of the bottom of the refrigerator.
(Ensure that you get the customer’s permission before attempting this more extreme measure.)
● Take compressed air and blow the dust from the back of the unit. The air is being pulled in from the front bottom of the unit.
● Some condensers can be accessed from the front, but the back will still need to be maintained.

By keeping the condenser clean, the unit will run more efficiently and the life of the refrigerator can be extended. Techs should always offer to clean the condenser on every job regardless if they are there for a different service call shows that the tech cares and is willing to offer above and beyond service.


Special thanks to Fred’s Appliance Academy for these valuable tips!

CE Tech Tips — June 2017

**NOTICE**

Due the danger and complexity of electronics repair, the following shared technical tips are intended for professional reference only. Please refer to manufacturer’s recommendations as Encompass does not guarantee the accuracy, reliability or safety of this information.


Hitachi Plasma,  42HDS52A
Reason for Service:  Low sensitivity, (short range) for the remote
Solution: Replaced  Led/IR receiver:  X480310.

Insignia TV,  NS-55E560A11
Reason for Service:  Dead
Solution: Check the following Shotkey diodes on the power PCB:  VD838, VD839, VD840, VD841.  Replace any that are defective. 

Mitsubishi DLP TV, WD62527
Reason for Service:  Too much green in picture
Solution: Remove, clean and reseat the DVI cable between the chassis and optical engine.  If this doesn’t work, you may need to replace the optical engine.

Philips TV,  27HT7210D/27
Reason for Service:  Set will not power on, but relay clicks
Solution: Found a bad cap, C7, on side board: 220uF/25V.  It would be time well spent to also check all connections for bad solder.

Samsung TV,  LN-S3241D
Reason for Service: Bottom half of the picture is dark
Solution:  Replacing the T-Con fixed the set.

Sony TV,  KDL40V4100
Reason for Service:  Picture very bright, and Bright control has no effect
Solution:  This one was a bad panel.

Vizio TV,  E230VL
Reason for Service:  Dead, no Vizio light
Solution:  Replaced F601, Q706 and Q707, both on the power board.  KF5N50DS

Vizio TV,  E322VL
Reason for Service:  When you turn set on, the logo goes from amber to white, but keeps alternating amber, then white.  Set won’t start.
Solution:  Replacing main board didn’t seem to fix the set.  This set has built-in Wi-Fi, and requires a couple of minutes to initialize the boot up.   Set okay after that.


Online Password Managers

“I use the same password for everything, how can I expect to remember all these different logins otherwise?”  Does this sound familiar?  Many folks use the same practices for Internet security that were employed during the 1990s, but in today’s modern environment, these methods are inept.  Just think about the number of websites that you and your business deal with that require separate logins and passwords:

  • Nearly every Parts Distributor has their own platform requiring a login to order parts
  • Every manufacturer, assuming you are authorized, has their own login/password to look up technical documentation
    –Some have separate apps requiring a login/password to access educational material
  • If you are working on warranty calls, the platform to submit your claim
  • Third party directories that list your business like Yelp and Yellow pages
  • Your accounting software and bank accounts
  • Your credit cards

The list goes on and on, and it’s not going to get any simpler.  Many of you may think this doesn’t apply because you call in parts orders or don’t bank online.  However, you are still at risk.  Your banking information is online, your credit card information, your warranty claims, and your part orders are all stored online.   All that information is available to hackers whether you agree to use those services or not.

Let’s lay out a scenario that has happened already.  You have a credit card with Target. You decide not to use any online features, but Target as a company gets hacked.  What hackers tend to do is seize login information.  They are banking on the fact that you use the same login and passwords for other accounts.  Once they have your “master password,” they start trying to use it on other websites, like your bank or social media accounts or your email.  This is how an identity gets stolen, and the ones most at risk are the folks who do not use online features.  They are not getting notifications that someone just accessed their online account and are not being alerted that money has moved from one account to another until it’s too late.  Now you have an uphill battle to recover anything that was stolen, along with having to prove your identity to each affected account.

So what do you do? If you use the same password on everything, you may have a problem. Although nothing is 100% secure, you may consider a password manager service such as Lastpass. Here are a few of the Lastpass features you receive for a monthly fee:

  • Sets up a Master Password for your account.  Even LastPass doesn’t know what it is.  There is a lengthy process on recovering the password if you forget it, but it’s designed to prevent a hacker from accessing your information.
  • Helps you generate unique passwords with various characters like C42$%!asdRTW492
    –Now if your Target account is hacked like in our scenario from earlier, there’s no need to panic.  Each password in your LastPass account is different.  Just update to a new password and go about your day.
  • The tedious part is adding each website you use to the LastPass Vault. But once you do, you launch every site you want to access from the vault.  It takes you to the page and, in some cases, auto-logs you in.
    –If you are a service manager, this is a HUGE benefit.  You can set up a folder in your vault with all the login/passwords your technicians need (tech support websites, part lookups, etc.) and share the entire    library in a couple clicks.  You can even restrict your employees from seeing the password so they can access the account but not change the password.
    –If you have to let an employee go, you simply unshare the folder. Simple, fast, and the peace of mind knowing your accounts are secured from a disgruntled employee.

Getting a password manager configured is just the first step.  Look for future articles from us as we continue to discuss appliance repair and ways to keep your online accounts secure.

Special thanks to Fred’s Appliance Academy for this valuable tip!


CE Tech Tips — May 2017

CE Professional Tech Tip Sharing
May 2017

**NOTICE**

Due the danger and complexity of electronics repair, the following shared technical tips are intended for professional reference only. Please refer to manufacturer’s recommendations as Encompass does not guarantee the accuracy, reliability or safety of this information.

Emerson TV,  LC320EM1F
Reason for Service:  Takes many tries to get the set to start
Solution:  Replacing Q1970 and D1979 on the inverter board fixed the set.

Emerson TV,  LC320EM2F
Reason for Service: Dead set, no LED
Solution: Check and replace as necessary:  Q600, K10A50D,  Q601, 2SC2120,  R608, 0.18ohm,  D604, 27V zener, D607, NTE177,  D610,  36V zener,  D640, SK2B 

Hitachi TV, 60SDX88B
Reason for Service:  Shuts down
Solution: Q777, Q657 and EP98

Mitsubishi TV, WS55413
Reason for Service: Shuts down when you power on with error 2-2
Solution: On the main board, replaced open fuse F9B01, IC9B02, 270P668020 and D9B07,  264P484030.

Philips TV, 42PFL3704D/F7
Reason for Service:  Set clicks when you plug it in, but won’t turn on
Solution:  Replacing the Digital Main Board fixed the set.  A91H5MMA-002 

Sharp TV, LC32D47U
Reason for Service: Set requiring password, but customer has forgotten it.
Solution:  Initialize set to out-of-box state. While holding down the volume down and input on the set, plug it in.  When you see a ‘K’ on the screen, let the buttons go, then hold down volume and channel on the set.  You should see initialize on the second page. When you see a green screen, unplug the set. 

Sony TV, DA4
Reason for Service:  Shuts down intermittently or will not power up at all
Solution: Was not the MCX3001DB repair.  Replacing the inrush relay, RY6502 fixed the set.

Westinghouse TV, LD-4655VX
Reason for Service:  No backlights
Solution: Set known to have short problems on the ribbons to the LED strips.  Disassemble, inspect and insulate anywhere the ribbons are touching metal.