How to Disassemble KitchenAid Double Wall Oven
**NOTICE**
Due to the danger and complexity of electronic equipment repair, the following technical tip is intended for professional reference only. Please refer to manufacturer’s recommendations as Encompass does not guarantee the accuracy, reliability or safety of this information.
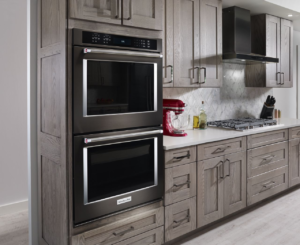
The KitchenAid 30-inch double wall convection oven (model #KODE500ESS) is the focus of these tech tips.
Throughout this article are caution alerts signaling a part may be heavy, fragile or comprise unseen sharp objects.
Before beginning any appliance repair project, please remember to always unplug the unit from its power source or shut off the breakers that control the oven.
How to Remove Oven Door
Oven doors are surprisingly heavy, so be prepared when removing it from its hinges.
- Open oven door all the way.
- Rotate both door hinge locks toward the oven, releasing door hinges from oven, so it can be removed.
- Close door to 45-degree angle; grab each side of door; and pull toward you to remove.
- Lay oven door with handle side down on protective blanket or other soft surface.
 How to Access Broil Element and Oven Sensors
- Be careful to avoid sharp edges when removing and replacing heating elements and oven sensors.
- Remove all oven racks to gain clear access to rear of oven.
- Use ¼ inch nut driver to remove screws from bracket that holds heating element to rear of oven.
- Remove two screws that hold upper heat shield in place.
- Carefully pull heating element away from back of oven and disconnect each wire from connector.
- Ensure heating element wires are completely connected to accompanying terminals.
- Realign broil element and shield by inserting oven sensor through large opening in element bracket.
- Realign smaller front shield and fasten in place with two screws previously removed.
- Replace rear bracket screws.
- With ¼ inch nut driver, remove screws that hold oven sensor bracket in place.
- Gently pull sensor toward you until you see wire connector. (Avoid allowing wire to slip through rear panel or double oven will have to be pulled out of cabinet to correct.)
- Disconnect wire connector.
- When installing new sensor, remember to first connect wires to connector.
- Feed wire through rear panel and secure sensor bracket with screws.
- After reconnecting element and sensor, replace oven racks.
How to Disassemble Oven Door
One of the main reasons to disassemble the oven door is to replace damaged door hinges.
- Use Philips screwdriver to remove four screws securing inner door frame to outer door assembly.
- Remove frame, being mindful of sharp edges.
- If replacing door hinge, lift window pack from outer door assembly. Remove two screws that secure hinge, as well as middle screws holding window pack bracket.
- With screws removed, slide out old hinge assembly.
- Install new door hinge by sliding assembly into outer door frame.
- Replace screws and tighten.
- Reassemble door by placing window pack in outer door assembly. Ensure engraved notations are visible.
- Realign inner door frame on outer door assembly.
- Replace and tighten four screws on door assembly with shorter screws inserted into frame bottom.
- Reinstall door by sliding door hinges into designated hinge slots at 45-degree angle.
- Lower door to fully open position and rotate hinge locks forward.
How to Remove and Replace Damaged Control Panel
- Remove four screws, two on each side, holding oven frame to cabinet.
- With help, slide oven about 4 inches out from cabinet.
- With ¼ inch nut driver, remove two screws, one on each side, to remove control panel mounting brackets.
- Remove four screws that secure panel assembly.
- Lift control panel up to remove, being careful of sharp edges.
- Disconnect communication wire and ground wire from control panel.
- Install new control panel by connecting communication wire and ground wire to user interface board.
- Align control panel to frame and replace four screws that secure panel to mounting bracket.
- Realign mounting bracket and secure with two screws.
- Slide oven back into cabinet.
- Ensure side trim pieces are in place and secure oven frame to cabinet.
How to Access Upper and Lower Thermostat and Cooling Fan
One of the signs that an oven has a blown or damaged thermostat is the oven is not heating correctly. Unfortunately, the entire double oven must be removed to access the thermostat.
- Remove both oven doors as outlined above.
- Remove bottom vent and oven racks.
- Remove wall frame.
- With help, remove entire oven from cabinet and lay on cardboard, blanket or something to protect the floor.
- Use ¼ inch nut driver to remove both rear access panels, being careful to avoid any sharp edges.
- To access lower thermostat, remove cooling fan blower first.
- Remove blower fan access panel and disconnect baking element wires.
- Disconnect power cable from blower fan assembly, remove fan assembly and set aside.
- Use ¼ inch box wrench to remove bracket screws holding thermostat in place.
- Use piece of tape to help indicate thermostat wire orientation. It does matter which wire goes to which terminal.
- Attach wires to new thermostat and place where old thermostat was located. Tighten thermostat in place with screws previously removed.
- Reposition cooling blower fan assembly on brackets and tighten screws.
- Reconnect power wire.
- Button up access plate.
- Remember to reconnect bake element wires.
- Replace rear access panel.
- With help, lift and slide double oven back into cabinet.
- Button up frame with screws previously removed.
Please note that you must access the rear panels if you want to replace a heating element, thermostat, or cooling blower fan assembly.
Special thanks to Fred’s Appliance Academy for this helpful tip!


Leave a Reply