Tech Tips

Whirlpool Cabrio Washer Bearing Replacement

**NOTICE**
Due the danger and complexity of electronics repair, the following shared technical tips are intended for professional reference only.
Please refer to manufacturer’s recommendations as Encompass does not guarantee the accuracy, reliability or safety of this information. 

This tech tip addresses Whirlpool Cabrio washer bearing replacement when the inner basket is seized/frozen. A customer may call stating that his/her washer is making a lot of abnormal sounds in the spin cycle. As the technician, you arrive at the home and find the tub bearing to have failed, causing the abnormal loud sounds during the spin cycle. The customer is quoted for the repair and agrees to have the unit fixed. After returning from the truck with parts, tools and floor 
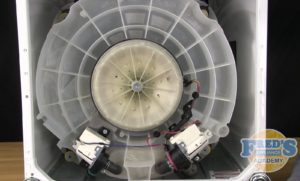
protection, you find that the inner basket is seized/frozen to the drive shaft. By following the steps below, you should have no problem repairing the unit to get it to perform back to normal factory operation.

Take your time, and remove the wash plate and tub ring first. You’ll then want to secure the lid using a bungee cord or painter’s tape. Next, lay down plenty of floor protection and place the unit on top. Remove the rotor and stator assembly to access the drive shaft nut. Once the nut is exposed, use a blue lock nut plate and a pair of channel lock pliers.

Once the nut is removed, use a mini sledge hammer to remove the drive shaft and basket assembly as one piece using the mini sledge on the bottom of the drive shaft to remove the shaft out of the bearings. Once the basket and shaft are free, hit the top of the shaft with the sledge hammer to free the shaft from the basket. After all the old parts are removed from the unit, thoroughly clean the basket where it slides down over the shaft using a scrubbing sponge to remove all debris.

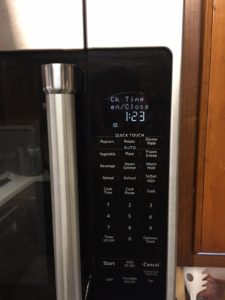
Now that all the hard work is done, follow the information in this video to reassemble the unit. Follow each step carefully, and test the unit with a load of six towels in a rinse and spin cycle looking for abnormal sounds and any possible leaks. This type of call may take some time out of your day and put you behind, but it’s a good money maker especially if you stock the parts and tools in the truck.

Special thanks to Fred’s Appliance Academy for these valuable tips!

CE Tech Tips — April 2017

Consumer Electronics Professional Tech Tip Sharing
April 2017

**NOTICE**

Due the danger and complexity of electronics repair, the following shared technical tips are intended for professional reference only. Please refer to manufacturer’s recommendations as Encompass does not guarantee the accuracy, reliability or safety of this information.

Hitachi TV, 57UWX20B
Reason for Service: No video
Solution: Found L306 open, replacing fixed the set.

Mitsubishi TV, LT-52246
Reason for Service:  Dead, no standby
Solution: Found two bad resistors on the power board:  R9A19 and R9A20.  Both 68kohm

Panasonic Plasma, TCP50S30
Reason for Service:  Shuts down with 8 blink code
Solution:  Discovered loose ground screws on the SS board.  Replacing them with Panasonic kit XYN3+F6FJ-18PK fixed the set.

Philips TV, 50PFP5332D/37
Reason for Service: Set powers on with the run light, but panel doesn’t prime
Solution:  Replacing the logic control board fixed this set.

RCA TV, F36650,  ATC113
Reason for Service: Partial loss of vert on top and bottom; has white lines in picture
Solution: Replaced DF01,  #155276.

Samsung TV, LN32C540
Reason for Service:  Has standby, but nothing works
Solution: Common problem is CM808 in the power supply board.  0.018 polyethylene/800V cap (18nF), use a higher voltage.

Viewsonic TV, N3252W
Reason for Service:  No video, sound okay
Solution:  Replacing the T-Con fixed the set:  320WA01

Vizio TV,  SV471XVT
Reason for Service:  Won’t come on.  In standby, amber logo is visible, but nothing happens after that.
Solution: Check two 470uF/35V caps on the inverters.  Replace as needed.

Vizio TV,  VX37LHDTV10A
Reason for Service:  Power comes on with backlight, but no audio, video or OSD.  Logo does turn to white.
Solution: Replacing U7, AMC1117 and U9, K1117 fixed the set.


Gas or Electric Dryer Service Best Practices

**NOTICE**

Due the danger and complexity of electronics repair, the following shared technical tips are intended for professional reference only.
Please refer to manufacturer’s recommendations as Encompass does not guarantee the accuracy, reliability or safety of this information.

When servicing a Gas or Electric dryer, no matter the complaint, a technician should always first make sure the unit is unplugged or turned off at the breaker to prevent accidental short or electric shock. Dryers have many moving parts, such as rollers, idler pulleys, rear drum bearings, motors and blower wheels that need maintenance and inspection during each service call.

There are many things that can cause one or more of the components listed above to fail.  For example, excessive lint built up inside the unit that is abrasive to the bearings in the motor, and rollers. When servicing or maintaining the bearings and rollers make sure to only use a 3 in 1 turbine oil like ​Zoom Spout​.  Never use just any grease as the lint will stick to the grease causing the component to bind or seize. If the component is making a noise, it has failed and by just lubricating to cure the noise is only band-aiding the issue for a short time and the part will need to be replaced.

When it comes to maintaining or replacing the rear drum bearing in the GE (some models) or Frigidaire models, it is important to apply a good amount of white lithium grease to help maintain the lifespan of the new or old part. The white lithium grease should only be applied to the rear bearing.

Good practice when servicing dryers is as follows:

  • Check venting making sure the customer has proper vent: for example, semi-rigid, galvanized steel or aluminum with the proper elbows attached (no plastic or foil venting as they are considered fire hazards).
  • Check all moving parts and apply the correct lubricant (white lithium grease for rear bearings and 3 in 1 turbine oil for rollers and pulleys).
  • If the part is making noise, replace.
  • Vacuum out the unit with a Shop Vac to clear all excessive lint that builds up on the floor and inside the blower.
  • Check lint filter by running under water, checking for restrictions built up from too much fabric softener. Use soft bristled brush to clean the filter of any fabric softener. Check airflow of the unit outside and advise customer if venting needs cleaning; this should be done about once a year.
  • For electric units, check cord for heat marks on the terminal blockand prongs.
  • For gas units, check to make sure gas shutoffs and lines are updated.

Following these steps will not only increase the lifespan of the unit, but will also satisfy customers by demonstrating you care by taking the extra time to be thorough.

Special thanks to Fred’s Appliance Academy for these valuable tips.

CE Tech Tips — March 2017

**NOTICE**

Due the danger and complexity of electronics repair, the following shared technical tips are intended for professional reference only. Please refer to manufacturer’s recommendations as Encompass does not guarantee the accuracy, reliability or safety of this information.

Hitachi TV, 60SX2K
Reason for Service:  Loss of audio in the surround mode only
Solution:  Replaced defective three-way surround board.

LG plasma, 50PA4500-UMAW-DUHR
Reason for Service:  Plays okay for a short while, then LG logo appears and no buttons work.
Solution: Check to see if C802 has turned black; if so, replace it.  22nF/1250V

Mitsubishi TV, LT-52246
Reason for Service:  Dead, no standby
Solution: Found two bad resistors on the power board:  R9A19 and R9A20.  Both 68k ohm.

Philips TV, 50PFP5332D/37
Reason for Service: Just clicks when you plug set in.
Solution: Found several bad caps on power supply board: DC8404, 8405, 8413 & 8414, all 680uF/50V and DC8013,  1000uF/16V.

Sanyo TV, DP50747
Reason for Service:  Turns off while playing
Solution:  Found bad solder on Q110, and replaced three domed caps.  C175, C176 & C177,  2200uF/10V.

Sony TV,  KDL40V4100
Reason for Service:  Picture very bright; bright control has no effect
Solution:  This one was a bad panel.

Toshiba TV, 62HMX94
Reason for Service:  Bad lamp (shattered); installing new lamp did not fix the set. Crackling noise in ballast area.
Solution:  Replacing the ballast allowed the set to work with the new bulb.

Vizio TV, VX37LHDTV10A
Reason for Service: Set will turn on with back light, but no Video, Audio or OSD.  Logo turns white.
Solution: Found regulator U5 bad, AMC1117.


CE Tech Tips — February 2017

CE Professional Tech Tip Sharing
February 2017

**NOTICE**

Due the danger and complexity of electronics repair, the following shared technical tips are intended for professional reference only. Please refer to manufacturer’s recommendations as Encompass does not guarantee the accuracy, reliability or safety of this information.

Disney TV/DVD, P1310ATVD
Reason for Service: Bright screen with retrace.
Solution:  Replaced the CRT socket. 

Hitachi TV, 60SX2K
Reason for Service: Loss of audio in TV mode only.
Solution: Replaced M-4001. 

Mitsubishi TV, WD65638
Reason for Service: Lamp was out.  Replacing the lamp, set worked for a couple of minutes, the picture flashed and color wheel began making noises.
Solution:  Replacing the lamp and the color wheel fixed the problems. 

Panasonic Plasma, TCP50S30
Reason for Service:  Shuts down with 8 blink code.
Solution:  Discovered loose ground screws on the SS board.  Replacing them with Panasonic kit XYN3+F6FJ-18PK fixed the set. 

Philips TV, 50PFP5332D/37
Reason for Service:  Shuts down at turn on.
Solution: Reseating all cables fixed the set.

RCA TV, F36650, (ATC113)
Reason for Service:  The vertical was compressed intermittently at top third of screen.
Solution: Replaced CV32 and fixed the problem. 1000uF/25V. Clean the board well after removing the old cap. 

Sharp TV, LC-26SH10U
Reason for Service: Has sound, but no back light.  Has 24V to the inverter.
Solution: Found an open fuse on the inverter board; replacing it fixed the set. 

Vizio TV, E421VO
Reason for Service: When you turn set on, you see splash screen for a few seconds, then backlights go off, no video, OSD or sound.  Could not turn set back off.
Solution:  Replaced the IR receiver board.

Vizio TV, VX37LHDTV10A
Reason for Service:  Power comes on with backlight, but no audio, video or OSD.  Logo does turn to white.
Solution: Replacing U7, AMC1117 and U9, K1117 fixed the set. 

Westinghouse TV, TX47430S
Reason for Service: TV shuts down after a popping sound.
Solution: Found a lot of old solder on the power board, resoldering fixed the set.

Why Force a Defrost – Samsung Refrigeration

Courtesy of Richard Sedlack, Owner/Lead Trainer, Level 2 Learning

**NOTICE**

Due the danger and complexity of electronics repair, the following shared technical tips are intended for professional reference only. Please refer to manufacturer’s recommendations as Encompass does not guarantee the accuracy, reliability or safety of this information.

Since the Genesis of Electronically-Controlled Refrigerators in 2000, one of the first questions I am asked during training is “How do I put (it) into DEFROST?” The “It” being the brand of refrigerator I am training on that session. As a Field Engineer, the reason seems obvious: defrost system components are among the top replaced parts for a “no cool” complaint. The ability to energize that system for testing is a must.

But with Samsung, there are many more procedures that require this. In these cases, you need to Force Defrost before taking one tool out of your bag. Why? For one, removal of the Direct Contact Icemaker. This system includes the icemaker “clamped” to an evaporator tube. Force Defrost, indicated as “Fd” on the seven segment displays, activates the ice maker’s heater loop as well. In fact, depending on the model you are working on, Force Defrost will also activate other electric heaters in the appliance. Those may include the fill tube heater, damper door heaters and duct heaters, besides the obvious defrost heater.  Regardless, removing that icemaker while it is frozen to the cooling tube will result in YOU buying the customer a new refrigerator.

 But wait, there’s more!  Since Samsung’s evaporator covers are mounted so close to the evaporator itself, it is a MUST to Force Defrost before attempting to remove that cover.  If not, it’s a sure bet the compressed foam type insulation behind the cover will break, and air flow will be severely compromised upon reassembly.

How do you Force Defrost?  Well, on “tabletop” control models, press the Power Freeze and Fridge buttons simultaneously for about 8 seconds, until the display goes blank. Then, press any other button until “Fd” appears.  A Beep should sound and defrost begins.

For dispenser models, press Freezer (top left) and Lighting (middle right) buttons simultaneously for about 8 seconds, until the display goes blank. Then, press any other button until “Fd” appears.

After complete you MUST disconnect from power to reset! As always, refer to the Samsung Fast Track Document for the model in question to verify. For some older models with bar level display, you must refer to the Fast Track for that model. Work smarter, Not harder.

Whirlpool Over-the-Range Microwave Door Issue

Appliance Tech Tip
January 2017

Courtesy of Fred’s Appliance Academy

DISCLAIMER: Due the danger and complexity of electronics repair, the following shared technical tips are intended for professional reference only. Please refer to manufacturer’s recommendations as Encompass and Fred’s Appliance Academy do not guarantee the accuracy, reliability or safety of this information.
Electrical Shock Hazard: Disconnect power before servicing.
Replace all parts and panels before operating. Failure to do so can result in death or electrical shock.


For that last two years, there have been several trouble calls for the Whirlpool/Maytag brand OTR microwaves (common complaint: Customer can not start the unit and the display says “open / close door.”)

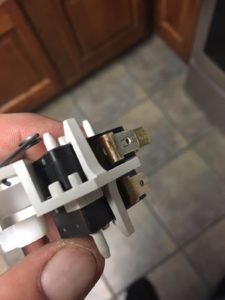
We have found that some techs would just replace the interlock micro switches and have to return the next week due to the same issue. Other techs may just order each piece of the cam assembly, but again they must return a week later for the same issue.  Instead of ordering these items separately, the complete interlock cam/switch assembly come all together in the low voltage wire harness (W10450407). There is an issue with an imperfection in the cam assembly causing the cam to roll over the switch a little too far, causing internal arcing in the switch.

This is a quick, easy repair requiring only a phillips head screwdriver, #10 torx driver and the wire harness. If all parts are replaced together, the problem will be resolved.  Microwaves deal with very high voltages that can cause serious injury or even death.  If you are not comfortable or experienced in microwave repair, DO NOT ATTEMPT THE REPAIR.  Call a professional service company in your area for assistance.


Special thanks to Fred’s Appliance Academy
academy.fredsappliance.com

CE Tech Tips — January 2017

CE Professional Tech Tip Sharing
January 2017

**NOTICE**

Due the danger and complexity of electronics repair, the following shared technical tips are intended for professional reference only. Please refer to manufacturer’s recommendations as Encompass does not guarantee the accuracy, reliability or safety of this information.


Hitachi TV,  51 UWX20B
Reason for Service:  No video, audio or OSD.  Turn up screens and you can see some video.
Solution:  Check video mute AC Protect and Horz Blank and found Q445 shorted.

Insignia TV,  NS-55E560A11
Reason for Service:  Dead
Solution: Check the following Schottky diodes on the power PCB:  VD838, VD839, VD840, VD841, and replace any defective ones.

Mitsubishi TV,  WS55413
Reason for Service: Shuts down when you power on with error 2-2
Solution: On the main board, replaced open fuse F9B01,  IC9B02, 270P668020 and D9B07,  264P484030.

Panasonic TV, PT51HX43G
Reason for Service:  Set is dead, B+ at 60V
Solution:  Replacing D502 fixed the set.

Samsung TV, LN32C540
Reason for Service:  Has standby, but nothing works
Solution: Common problem is CM808 in the power supply board.  0.018 polyethylene/800V cap.  (18nF) Use a higher voltage.

Sharp TV, LC37D43U
Reason for Service: Won’t power up, no indicator.
Solution:   Replaced a defective 150V, 5W zener on the power board.  Fixed the set.

Sony TV, KV40XBR800
Reason for Service: Dead or shuts down when plugged in, 6 blink code.
Solution: Replacing C6556 fixed the set.  33uV/160V.

Vizio TV,  GV47LFHDTV10A
Reason for Service:  Has backlight but no video.
Solution: Found U10 on the main board was defective.


CE Tech Tips — December 2016

CE Professional Tech Tip Sharing
December 2016

**NOTICE**

Due the danger and complexity of electronics repair, the following shared technical tips are intended for professional reference only. Please refer to manufacturer’s recommendations as Encompass does not guarantee the accuracy, reliability or safety of this information.

Crosley TV, C23HDVDHB
Reason for Service: Have to push Power several times before TV comes on.
Solution: Check for bad caps on small power supply board.  C4, C5, C6 were all bad.  680uF/25V.

Emerson TV,  LC320EM1F
Reason for Service:  It took many tries to get the set to start.
Solution:  Replacing Q1970 and D1979 on the inverter board fixed the set.

Hitachi TV,  57UWX20B
Reason for Service:  No video or audio or OSD.  If you turn up the screens, you see some video.
Solution:  Checking video mute, AC protect and Horiz blanking found Q445 shorted.  Replacing it fixed the set.

Mitsubishi TV,  WD60638
Reason for Service:  After the set is warmed up, picture flickers.
Solution: Replacing the color wheel fixed the set.  938P179010

Philips TV, 50PFP5332D/37
Reason for Service: Intermittently locks up when powering on.
Solution: Replaced all the following caps on the Y main: C5011, C5014, C5024, C5051 and C5065. 

RCA TV,  ITC008
Reason for Service:  Intermittent shutdown.
Solution: Look for bad solder on the end of CL021. This is in the collector circuit of the HOT.  Resoldering this connection fixed the set. 

Samsung TV,  UN55D7000LFXZA
Reason for Service:  When you plug set in, it clicks repeatedly.
Solution: Replacing the power board fixed the set.  BN44-00428A

Samsung Plasma TV, PN50A450P1
Reason for Service:  Primes, but no picture.
Solution:  Replaced C5400 & C5706, (100uF/25V) on the Ysus and C4035, (680uF/25V) on the Zsus.  Also found open 5A fuse on the E Buffer, (runs along the bottom of the set.) 

Toshiba TV, 62HMX94

Reason for Service:  Bad lamp, (shattered), installing new lamp did not fix the set.  Crackling noise in ballast area.
Solution:  Replacing the ballast allowed the set to work with the new bulb.


Appliance Tech Tips – Whirlpool Microwave High Voltage Transformer

Appliance Tech Tips
November 2016

Courtesy of Fred’s Appliance Academy

DISCLAIMER: Due the danger and complexity of electronics repair, the following shared technical tips are intended for professional reference only. Please refer to manufacturer’s recommendations as Encompass and Fred’s Appliance Academy do not guarantee the accuracy, reliability or safety of this information.
Electrical Shock Hazard: Disconnect power before servicing.
Replace all parts and panels before operating. Failure to do so can result in death or electrical shock.

One of our field techs brought us an Over-the-Range microwave transformer that had an open primary winding (120vac side). Keep in mind, a transformer is not a likely component to fail in a microwave, but it can on VERY rare occasions (typical issues on the high voltage side are usually Magnetron, HV Diode, and/or Capacitor).

After checking the transformer (see below for how to properly check a microwave transformer), we came to find out that the transformer winding for the low voltage primary winding (the 120vac connection tabs) have a varnish on them that will cause the meter to not see the 120vac present at the input. Second, we found after scraping the coating away that the windings themselves are aluminum, not copper.

wpmicrowave

Whirlpool Microwave HIgh Voltage Transformer

With that said, the soldering joints for the connections of the low voltage primary winding are not holding, which is causing the transformer to look as though the primary winding is open. You will still have to replace the transformer, and we suggest you check the new one as well before pulling the unit off the wall and installing a defective part for nothing. Never try to fix a soldering joint or broken wire on the transformer itself as this poses a danger to not only you as a tech, but to the customer with the possibility that the unit may catch fire.

The transformer was found in a Whirlpool microwave; the part number is W10836753.  Since the same design is used for multiple model numbers and brand names (Maytag, Amana, etc.), we recommend referencing the part number to determine if the transformer you are working on might have the same issue. We expect that this was not an isolated incident, so save yourself the time and hassle and check the transformer before ordering other replacement parts.

To diagnose the working status of a transformer on a Whirlpool OTR Microwave:

  • Start by pulling unit down from wall
  • Primary winding should have less than 5 ohms
    • No continuity from primary winding to ground
  • High voltage secondary should have 35 to 150 ohms
    • Check from high voltage tab to ground
  • Low voltage secondary should have less than one ohm
  • If either transformer winding has failed, ohms will be way off

Special thanks to Fred’s Appliance Academy
academy.fredsappliance.com