
Replacing Dishwasher Circulation Pump and Assembly
**NOTICE**
Due the danger and complexity of electronic equipment repair, the following technical tip is intended for professional reference only. Please refer to manufacturer’s recommendations as Encompass does not guarantee the
accuracy, reliability or safety of this information.
One of the most common service calls involving malfunctioning dishwashers is inability to completely clean dishes. There are many reasons why a dishwasher might stop doing a thorough job. A malfunctioning circulation pump and motor assembly might be the culprit, and it’s one of the hardest parts to reach in the appliance.
What Does the Circulation Pump and Motor Assembly Do?
This piece of hardware controls the flow of water that exits in the dishwasher’s spray arms. It is controlled by the electric system and washer settings, but it’s also a mechanical part that moves and forces water out of the spray arms at different 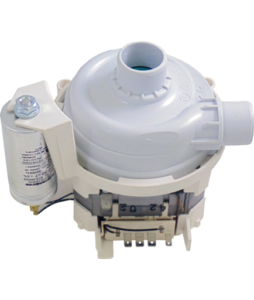 pressure settings. That means there are multiple different triggers that could force the pump and motor assembly to break.
One of the clearest signs of a broken assembly is dirty dishes. If water isn’t hitting the dishes with enough force to rinse away food or soap, then the pump may not be doing its job. However, anything from a poor dish arrangement to clogged holes in the spray arm can cause the same problem. Be sure to investigate other common causes or ask your customer for more details before replacing the part. Once you decide the assembly is at fault, order the replacement part (#1106293 for older Bosch models and 00442548 for Thermador dishwashers.)
Step-by-Step Instructions to Replace Circulation Pump and Motor Assembly:
- Unplug dishwasher and turn off water.
Every appliance repair should start with removal of the power source unless the appliance must be powered on during the job. Replacing a broken circulation pump and motor assembly involves disassembling both wire harnesses and water hoses, so both inputs need to be removed to keep you and the surrounding area safe. - Remove the base and outer door panels.
For this job you will need to access the dishwasher door’s interior parts. Locate the base panel under the dishwasher door. Loosen the two screws holding the panel in place, and set it aside. To remove the outer door panel, open the door and remove the six screws along the interior perimeter to release the panel. Next, shut the door and pull the bottom of the outer door panel away from the machine. You can then slide the panel down and remove it from the remaining door assembly. Set it aside. Additionally, loosen and remove the inner access panel between the base panel and the outer door panel for complete access to the machine parts.
- Pull out the dishwasher.
Before you move the dishwasher, disconnect the water line and drain hose under the sink. There is probably water in the drain lines so lay down a towel and have a container ready to catch any spills. Then, loosen the two screws and mounting brackets holding the dishwasher in place against the counter top. Grab the sides of the machine and gently wiggle or slide it free.
- Disconnect the interior parts around the base of the machine.
Remove the side covers on the left and right sides of the machine. Then remove the hinge link covers, which are the white plastic panels near the front. Once you set them aside, you will be able to see the door cable hooks that were underneath the covers. Remove them and loosen the screws holding the base of the dishwasher to the cabinet.
- Open the machine.
Remove the lower dish rack and the spray arms. Unscrew the filter bask and fine filter and set them aside. Also, unscrew and remove the spray arm support and the two sump supports before shutting the door. Lay the dishwasher on its back without pinching any loose hoses.
- Remove the dishwasher’s base to access the assembly.
This step involves a lot of disassembly and parts. If each step feels overwhelming or confusing, stop and snap a picture of the details. This will help you reassemble the machine and reverse your steps.Disconnect the sump hose from the water inlet and sump, then twist it out of the way without fully removing it. Gently wiggle the base of the dishwasher so it pulls slightly away from the rest of the machine. This is the section with all of the hoses and parts that you loosened in step five. While you shouldn’t completely remove it, you will need space to remove and install the circulation pump and motor assembly part.Remove the drain pump by pressing the latch and twisting it free. Set it aside without removing the attached wire harness. Then, remove the circulation pump the same way. Remove the drain outlet hose. This should let you pull the circulation pump assembly out of the base. Move it carefully and set it on top of the dishwasher without pulling at the attached wire harnesses.
Clean the sump’s gasket while the machine is open. This step isn’t necessary for the repair, but dishwashers can develop a lot of buildup. It’s unlikely the dishwasher will be disassembled to this extent again, so now is the perfect time for some quick cleaning and maintenance.
Remove the clamp holding the circulation pump to the heater assembly. If possible, set the clamp aside for later use. However, some clamps are not reusable, so bring a spare clamp with you to the repair site.
Disconnect all of the wire assemblies. At this point in the disassembly, take a picture. It’s hard to remember where each wire harness should connect to the assembly, and having a picture on hand means you don’t have to worry about incorrect wiring.
Pull the assembly free of the heating and sump. It should come apart with enough pressure. Then, pry the pump seal away from the top of the part for later use. Also, remove the rubber straps to isolate the circulation pump and motor assembly. The ordered item contains the assembly part only, so you’ll need to save the seals, straps, and, if possible, clamp for reuse on the replacement part.
- Replace Assembly.
Put the sump seal back in position. Then put the clamp, or a new clamp, on the sleeve for later. Attach the assembly to the heater and sump by the pump ports. If the arms won’t fit, use an approved lubricant or soapy water to reduce the friction. Put the rubber mounting straps back in position and tighten the clamp around the arm. Next, reconnect the wire harnesses in the exact previous configuration.
- Insert New Assembly.
Secure the part inside the base of the dishwasher using the rubber straps. Then, reconnect the sump outlet hose and snap the drain pump back in position. Once it’s aligned, twist in clockwise for a tight seal. Once everything is positioned correctly, push the base of the machine back against the dishwasher. Make sure you aren’t pinching any parts. Then twist the water inlet hose back around and reattach it to its ports.
- Reassemble Dishwasher.
Set the whole machine upright once more. Resecure the base of the dishwasher by inserting and re-tightening the screws in the front and back of the base. Then open the dishwasher door and replace the spray arm parts and filters you removed earlier. Snap the spray arm into position and put the dishrack in the machine. Next, snap the door locks and hinge covers, and side covers back in place on each side of the machine.
- Move Dishwasher Back in Place.
Carefully push the machine back under the counter and re-secure the mounting screws to lock it in place against the countertop. Then reattach the hoses under the sink. Finish your reassembly by:
-Screwing in the inner access panel
-Sliding the outer door panel into place and then tightening the interior perimeter screws
-Securing base panel
Once you turn on the water connection and power, the dishwasher should now be able to clean each load of dishes without leaving behind residue. Ensure that the machine turns on and the cycle starts properly before completing the job. This repair involves a lot of disassembly, so it’s important to make sure everything is in working order, and that the hoses don’t leak.
Special thanks to Fred’s Appliance Academy for this helpful tip.


Comment (1)
We can all benefit from the knowledge you’ve provided here. I’m looking forward to your next blog! It will be a massive help to us.